
Crispy Breaded Halloumi Fingers Recipe
Introduction
Halloumi cheese, a semi-hard, unripened cheese made from a mixture of goat’s and sheep’s milk, has captured the hearts—and taste buds—of food enthusiasts around the globe. Known for its unique texture and high melting point, halloumi has become a staple in Mediterranean cuisine. This cheese boasts a distinctive squeaky quality when bitten into, making it a favorite for grilling or frying. Its mild, salty flavor pairs beautifully with various herbs and spices, allowing it to shine in a multitude of dishes.
One of the most delightful ways to enjoy halloumi is in the form of crispy breaded halloumi fingers. These delicious morsels are not only a fantastic appetizer but also make for a satisfying snack or light meal. Their irresistible crunch and rich, savory flavor make them an ideal addition to any gathering, whether it be a casual family dinner or a festive party. The simplicity of preparation makes them accessible for both seasoned cooks and culinary novices alike.
In this recipe, we will explore how to create crispy breaded halloumi fingers that are golden brown on the outside and delightfully chewy on the inside. With just a few key ingredients and straightforward steps, you’ll be able to whip up a platter of these irresistible snacks that your family and friends won’t be able to resist.
Understanding Halloumi Cheese
Origin and History
Halloumi cheese has its roots in Cyprus, where it has been produced for centuries. Traditionally, it was made by local shepherds using sheep’s milk, though modern variations often incorporate goat’s milk and even cow’s milk. This cheese has a rich history intertwined with the Mediterranean diet and is still enjoyed in various forms across different cultures today.
The cheese was originally created as a means of preserving milk, as its unique production process involves heating and kneading the curds before forming them into blocks. Halloumi gained international popularity in recent decades, thanks in part to the rise of Mediterranean cuisine and its inclusion in vegetarian dishes. Its versatility has made it a beloved ingredient in salads, sandwiches, and, of course, the delectable crispy breaded halloumi fingers.
Nutritional Benefits
Halloumi is not only delicious but also offers a range of nutritional benefits. With a high protein content—approximately 25 grams per 100 grams—halloumi is a fantastic protein source, making it a popular choice among vegetarians and those looking to incorporate more plant-based proteins into their diets. Additionally, it contains essential nutrients such as calcium and phosphorus, which are vital for bone health.
However, it’s important to note that halloumi also has a relatively high sodium content, so those watching their salt intake should enjoy it in moderation. When prepared as crispy breaded halloumi fingers, this cheese maintains its nutritional benefits while transforming into a mouthwatering snack that satisfies cravings for both flavor and texture.
Cooking Properties
One of the standout features of halloumi is its remarkable cooking properties. Thanks to its high melting point, halloumi can be grilled, fried, or baked without losing its shape. This quality makes it an ideal candidate for frying, resulting in a crispy exterior while remaining soft and chewy inside. When cooked, halloumi develops a delightful golden crust that enhances its flavor profile, making it a perfect base for various seasonings and breading techniques.
Ingredients Breakdown
Halloumi Cheese
The star of our recipe is, of course, halloumi cheese. To achieve the best results, it’s crucial to select high-quality halloumi. Look for blocks that are firm yet slightly pliable, with a clean, fresh aroma. Avoid any that appear overly soft or have a strong odor, as these can indicate spoilage or inferior quality. If possible, choose halloumi that is made from 100% sheep or goat’s milk for a richer taste and a more authentic experience.
Breading Ingredients
Creating the perfect crispy texture for our halloumi fingers involves a simple three-step breading process. The ingredients are:
– Flour: All-purpose flour serves as the initial coating, providing a dry surface for the egg to adhere to. This layer helps to create a barrier that locks in moisture while allowing the outer coating to become crispy.
– Eggs: Beaten eggs act as an adhesive, ensuring that the breadcrumbs stick to the halloumi. They provide richness and flavor, contributing to the overall taste of the dish.
– Panko Breadcrumbs: The key to achieving that desired crunch lies in using panko breadcrumbs. These Japanese-style breadcrumbs are coarser and airier than traditional breadcrumbs, resulting in a lighter, crispier texture when fried.
Seasoning Elements
To elevate the flavor of our crispy breaded halloumi fingers, we incorporate a blend of herbs and spices into the breading.
– Smoked Paprika: This seasoning adds a smoky depth of flavor that complements the mildness of the halloumi beautifully. Its vibrant color also enhances the visual appeal of the finished dish.
– Garlic Powder: A touch of garlic powder infuses the breading with a savory aroma that pairs well with the richness of the cheese.
– Oregano: Dried oregano brings a hint of earthiness that resonates with Mediterranean flavors, enhancing the overall taste experience.
These seasoning elements not only contribute to the flavor profile but also help to create a well-rounded dish that is satisfying to the palate.
Oil for Frying
When it comes to frying, the choice of oil can significantly impact both flavor and health. For crispy breaded halloumi fingers, consider using oils with a high smoke point, such as canola oil, vegetable oil, or even sunflower oil. These oils can withstand the heat required for frying without breaking down, ensuring a crispier result. Additionally, you may opt for olive oil for its robust flavor, but keep in mind that it has a lower smoke point, making it less ideal for deep frying.
Serving Suggestions
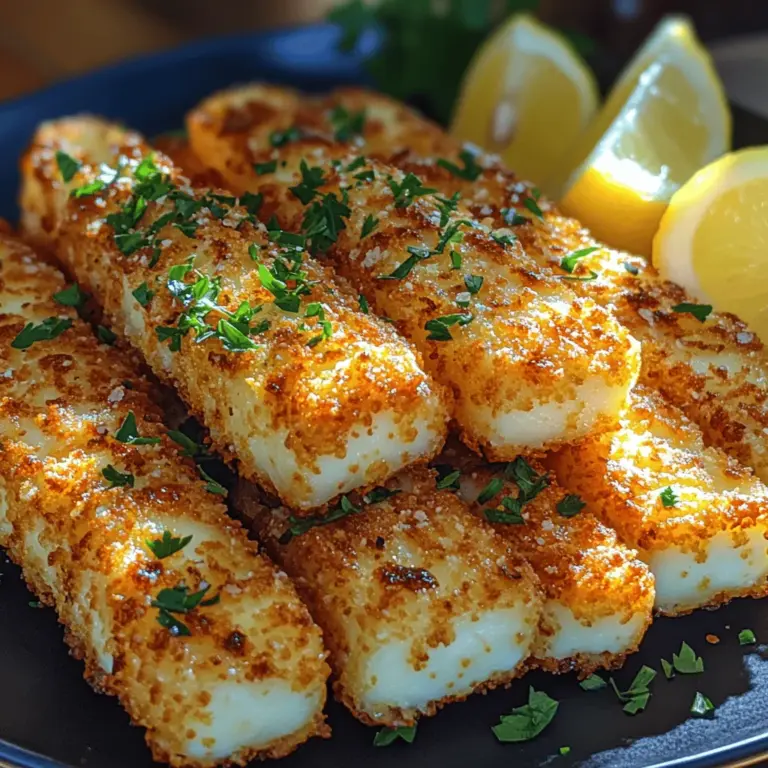
To enhance the enjoyment of crispy breaded halloumi fingers, consider serving them with complementary items. Fresh lemon wedges add a zesty brightness that cuts through the richness of the cheese. A side of tangy yogurt or tzatziki can provide a refreshing contrast, while a sprinkle of fresh herbs, such as parsley or mint, can elevate the dish’s presentation and flavor. These thoughtful additions can turn a simple snack into a gourmet experience, impressing guests and family alike.
With this foundational understanding of halloumi cheese and the key ingredients, we can now move forward to the cooking process that will bring these crispy breaded halloumi fingers to life. Stay tuned for the detailed steps that will guide you through creating this tantalizing dish!
{{image_2}}
Step-by-Step Instructions for Crispy Breaded Halloumi Fingers
Preparing the Halloumi
To begin your journey towards crispy breaded halloumi fingers, the first step is to prepare the halloumi cheese itself. Halloumi is a semi-hard cheese that holds its shape beautifully when cooked, making it perfect for frying.
1. Slicing the Halloumi: Start by removing the halloumi from its packaging and draining any excess liquid. Place it on a cutting board and slice it into fingers about 1/2 inch thick. This thickness is ideal for achieving that perfect balance between a crispy exterior and a soft, melty interior. If you cut them too thin, they may become overly crispy and lose their structure; too thick, and they may not cook through properly.
2. Prepping the Cheese: Once sliced, consider lightly pressing the halloumi fingers between paper towels to absorb any excess moisture. This step can help prevent splattering during frying and ensures a better breading adherence.
Setting Up the Breading Station
Creating an organized breading station is crucial for a smooth cooking experience. Follow these steps to set it up effectively:
1. Gather Your Ingredients: You will need flour, beaten eggs, and breadcrumbs (panko or regular) for the breading. Season each component with salt and pepper, and feel free to add additional spices to enhance flavor.
2. Arrange the Station: Set up three shallow dishes in a row, placing flour in the first dish, the beaten eggs in the second, and breadcrumbs in the third. Ensure that you have enough space to work easily without overlapping. Having the ingredients arranged in this order – flour, egg, then breadcrumbs – will streamline the breading process and minimize mess.
Breading Technique
Now that your halloumi is sliced and your breading station is ready, it’s time to coat the halloumi fingers properly.
1. Coating Process: Take one halloumi finger and dredge it in the flour, ensuring it is covered completely. Shake off any excess flour before moving on to the egg wash. This step is essential for creating a good base for the breadcrumbs to adhere.
2. Egg Dipping: Dip the floured halloumi finger in the beaten eggs, making sure it is fully coated. Let any excess egg drip off before proceeding to the breadcrumbs.
3. Breadcrumb Coating: Finally, place the egg-coated halloumi in the breadcrumbs, pressing gently to ensure a uniform coating. Turn it to coat all sides evenly, which is key to achieving that promised crunch.
4. Resting the Coated Halloumi: After breading, place the coated halloumi fingers on a clean plate and let them rest for about 10-15 minutes. This resting time allows the coating to set and adhere better, ensuring that it stays on during frying.
Heating the Oil
The success of your crispy halloumi fingers largely depends on the oil’s temperature during frying. Here’s how to heat your oil safely and effectively:
1. Choosing the Right Oil: Use a high smoke point oil such as vegetable oil, canola oil, or peanut oil for frying. These oils are resistant to burning and will give your halloumi a beautiful golden color.
2. Heating the Oil: In a large skillet or frying pan, pour enough oil to cover the bottom of the pan by about 1/4 inch. Heat the oil over medium heat. To test if the oil is ready, you can drop a breadcrumb into the oil; if it sizzles and bubbles, the oil is hot enough.
3. Safety Tips: Always be cautious when handling hot oil. Never leave it unattended, and avoid overcrowding the pan, which can lower the oil temperature and lead to soggy halloumi.
Frying Process
With your halloumi fingers coated and the oil heated, it’s time to fry them to crispy perfection:
1. Frying the Halloumi: Carefully place a few halloumi fingers into the hot oil, making sure not to overcrowd the pan. Fry them for about 2-3 minutes on each side or until they turn golden brown. Adjust the heat as necessary to maintain a consistent frying temperature.
2. Draining Excess Oil: Once golden brown, use a slotted spoon to remove the halloumi fingers from the oil and place them on a plate lined with paper towels. This will help absorb any excess oil and keep them crispy.
3. Repeat the Process: Continue frying the remaining halloumi fingers in batches, ensuring the oil returns to the correct temperature before adding more.
Serving Presentation
Presentation can elevate your dish from simple to stunning. Here are some ideas for serving your crispy breaded halloumi fingers:
1. Plating: Arrange the fried halloumi fingers on a large serving platter or individual plates. For a colorful touch, consider garnishing with fresh herbs such as parsley or cilantro.
2. Add Lemon Wedges: Serve with lemon wedges on the side. A squeeze of fresh lemon juice enhances the flavor and cuts through the richness of the cheese.
3. Garnishes: For an extra flair, consider drizzling a bit of high-quality olive oil or balsamic glaze over the top. This adds a sophisticated touch and balances the flavors beautifully.
Flavor Variations and Pairings
Dipping Sauces
One of the best aspects of crispy halloumi fingers is their versatility when it comes to dipping sauces. Here are some delightful pairings:
1. Tzatziki Sauce: This refreshing yogurt-based sauce, made with cucumbers, garlic, and dill, complements the salty flavor of halloumi perfectly.
2. Spicy Mayo: Mix mayonnaise with sriracha or your favorite hot sauce for a creamy, spicy dip that adds a kick to every bite.
3. Marinara Sauce: Serve your halloumi fingers with rich marinara sauce for a classic pairing that brings a taste of Italy to your plate.
Herb Infusions
Incorporating fresh herbs can elevate the flavor profile of your halloumi fingers:
1. Herb-Infused Breadcrumbs: Before breading, mix chopped fresh herbs like oregano, basil, or parsley into your breadcrumbs. This adds an aromatic touch and enhances the overall flavor.
2. Herb Garnishes: Use fresh herbs as a garnish on your serving platter. Not only do they add color, but they also provide an additional layer of flavor.
Alternative Seasonings
Experimenting with different seasonings in your breading can customize your halloumi fingers. Here are some suggestions:
1. Chili Powder: Adding chili powder to your flour or breadcrumbs introduces a smoky heat that pairs wonderfully with the cheese.
2. Italian Seasoning: A blend of dried herbs like basil, thyme, and rosemary can impart an Italian flair to your dish.
3. Garlic Powder: Mixing garlic powder into your breadcrumbs will give your halloumi fingers an extra savory kick.
Conclusion
Crispy breaded halloumi fingers are not only easy to make but also offer a delightful crunch combined with the rich, salty flavor of halloumi cheese. Whether served as a snack, appetizer, or part of a main dish, they are sure to please a crowd and become a favorite at gatherings or family dinners.
I encourage you to try this recipe and explore your creative variations, whether through different seasonings, sauces, or presentation styles. The versatility of halloumi makes it a fantastic addition to any menu, and its unique texture and flavor can be customized to suit any palate.
Incorporate crispy breaded halloumi fingers into your culinary repertoire, and let them shine at your next gathering or casual night in. Enjoy the process, experiment with flavors, and most importantly, savor every bite of this delicious dish!
