
Decadent Frozen Chocolate Strawberry Yogurt Truffles: A Delightful Treat
When it comes to satisfying your sweet tooth, few combinations can rival the classic pairing of chocolate and strawberries. The Decadent Frozen Chocolate Strawberry Yogurt Truffles offer a delightful twist on this beloved duo, merging the rich, indulgent taste of chocolate with the fresh, fruity flavor of strawberries, all enveloped in a creamy yogurt base. This recipe captures the essence of a luxurious dessert while maintaining a healthy profile, making it an ideal option for those seeking guilt-free indulgence.
These truffles stand out not only for their delightful flavor but also for their versatility. Whether you’re looking for a refreshing summer treat or a cozy winter dessert, these truffles are sure to please. They can be enjoyed as a light snack, a post-dinner dessert, or even a fun addition to any celebration. The ease of preparation makes this recipe accessible for both novice cooks and seasoned bakers alike. With just a few simple steps, you can create an impressive dessert that will impress friends and family.
Understanding the Ingredients
Before diving into the recipe, it’s essential to understand the ingredients that contribute to the deliciousness of these truffles. Each component plays a vital role in flavor and texture, ensuring a delightful experience with every bite.
Fresh Strawberries
The star ingredient of this recipe is undoubtedly the fresh strawberries. Using ripe, juicy strawberries not only enhances the flavor but also adds a beautiful pop of color to the truffles. Fresh produce is key when it comes to achieving the right balance of sweetness and tartness, making the truffles irresistible. Look for strawberries that are firm, bright red, and free from blemishes for the best results.
Greek Yogurt
Greek yogurt serves as the creamy base for these truffles, providing a luscious texture while also packing a nutritional punch. High in protein and lower in sugar compared to conventional yogurts, Greek yogurt is an excellent choice for a healthier dessert. You can opt for plain Greek yogurt for a tangy flavor or vanilla Greek yogurt for added sweetness. Both options work well, so choose based on your personal preference or dietary needs.
Sweeteners
To balance the tartness of the strawberries and the tanginess of the yogurt, a sweetener is essential. Honey and maple syrup are popular choices, each bringing its unique flavor profile. Honey offers a floral sweetness that complements the strawberries beautifully, while maple syrup adds a subtle caramel note. Both options are natural sweeteners, making them a healthier alternative to refined sugars. You can adjust the amount depending on your taste preferences and dietary considerations.
Dark Chocolate
For the chocolate coating, dark chocolate is the preferred choice due to its rich flavor and lower sugar content compared to milk chocolate. Dark chocolate is also known for its health benefits, including being rich in antioxidants. If you have specific dietary needs, there are plenty of alternatives available, such as dairy-free chocolate or even carob chips, which can be used to achieve a similar taste without the dairy.
Coconut Oil
Coconut oil plays a crucial role in achieving a smooth and glossy chocolate coating. It helps to thin the chocolate, making it easier to dip the truffles and ensuring a beautiful finish. Additionally, coconut oil adds a subtle hint of flavor that complements the other ingredients. If you’re looking for a substitute, vegetable oil can work in a pinch, but coconut oil is recommended for the best results.
Sea Salt
A pinch of sea salt enhances the overall flavor of the truffles, balancing the sweetness and accentuating the chocolate. The contrast of salty and sweet is a winning combination that elevates the taste of the truffles. When adding sea salt, be sure to use it sparingly to avoid overpowering the other flavors.
Optional Toppings
While the truffles are delicious on their own, adding custom toppings can bring an extra layer of texture and flavor. Consider rolling the truffles in crushed nuts, shredded coconut, or sprinkles for a fun and festive touch. These toppings not only enhance the visual appeal but also add crunch and variety to each bite.
Step-by-Step Preparation Guide
Now that you have a solid understanding of the ingredients, it’s time to dive into the preparation of your Decadent Frozen Chocolate Strawberry Yogurt Truffles. Follow these step-by-step instructions to create your own batch of truffles that are sure to impress.
1. Preparing the Strawberry Mixture
The first step in creating these truffles is preparing the strawberry mixture. Start by rinsing your fresh strawberries thoroughly under cool water. Once clean, remove the green tops and hull the strawberries. It’s important to use ripe strawberries for the best flavor, so choose those that are firm and fragrant.
Next, chop the strawberries into small pieces. This will help them blend more easily and incorporate smoothly into the yogurt mixture. The goal is to create a mixture that has a good balance of berry chunks and creamy yogurt.
In a mixing bowl, combine the chopped strawberries with Greek yogurt and your choice of sweetener—honey or maple syrup. Use a fork or a spatula to gently fold the ingredients together until they are well combined. Be careful not to overmix, as you want to retain some texture from the strawberries. Taste the mixture and adjust the sweetness if necessary, adding more honey or maple syrup to suit your preference.
Once the strawberry mixture is well blended, it’s time to form the truffles. Using a small cookie scoop or your hands, take a portion of the mixture and roll it into bite-sized balls. Place each ball on a parchment-lined baking sheet, ensuring they are spaced apart for easy handling.
After forming all the truffles, place the baking sheet in the freezer for approximately 30 minutes. This will allow the truffles to firm up, making them easier to coat in chocolate later on.
2. Melting the Chocolate Coating
While the truffles are chilling, you can prepare the chocolate coating. In a microwave-safe bowl, combine your dark chocolate chips and a tablespoon of coconut oil. Heat the mixture in the microwave in 30-second intervals, stirring in between, until the chocolate is fully melted and smooth. Be careful not to overheat the chocolate, as it can seize up if cooked too long.
Once the chocolate is melted and glossy, remove the truffles from the freezer. Using a fork, dip each truffle into the melted chocolate, ensuring it is fully coated. Allow any excess chocolate to drip off before placing the truffle back on the parchment-lined baking sheet.
As you coat each truffle, consider sprinkling on any optional toppings you desire. This is the perfect opportunity to add a touch of personalization to your truffles, making them uniquely yours.
After all truffles are coated, return them to the freezer for another 15-20 minutes, or until the chocolate has hardened completely.
This step-by-step process sets the foundation for delicious Decadent Frozen Chocolate Strawberry Yogurt Truffles that are not only visually appealing but also a joy to eat. As you prepare these delightful treats, you’ll find that the combination of fresh strawberries, creamy yogurt, and rich chocolate creates a satisfying dessert that’s perfect for any occasion. Whether you’re treating yourself or sharing with friends, these truffles are sure to be a hit. Stay tuned for the next part of the article, where we’ll explore additional tips and variations to make these truffles even more exciting!
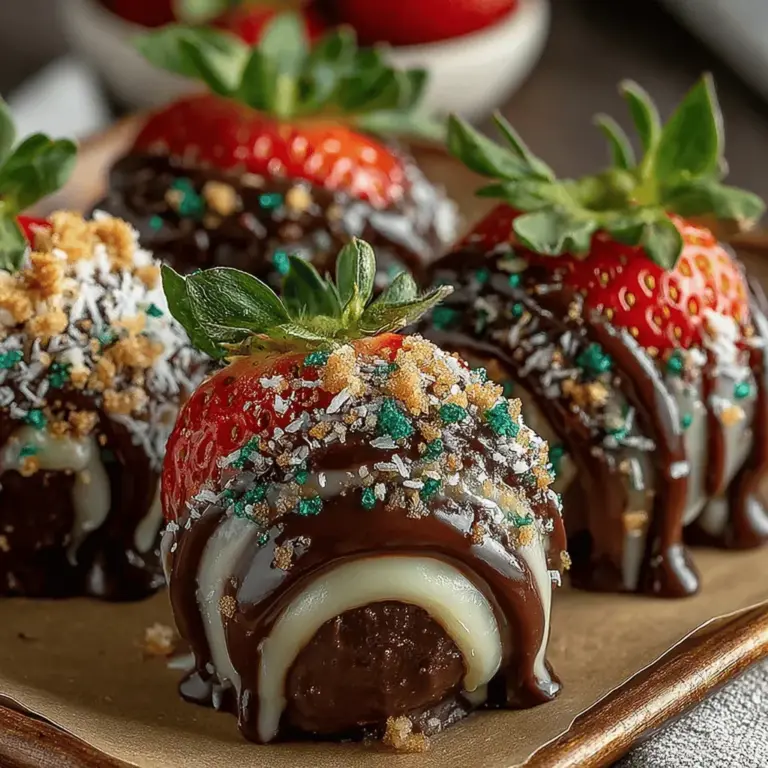
{{image_2}}
Creating the perfect decadent frozen chocolate strawberry yogurt truffles is a delightful journey into the world of sweet treats. These indulgent bites combine the rich taste of chocolate with the fresh flavor of strawberries and the creamy texture of yogurt, making them an irresistible dessert option. Let’s dive into the detailed steps to craft these delectable truffles, along with tips for serving and enjoying this treat.
Forming the Truffles
Once your mixture has chilled and is ready for shaping, it’s time to roll the truffles. Proper techniques will ensure your truffles have a perfect shape and texture.
Techniques for Rolling and Shaping Truffles
1. Use Chilled Hands: To prevent the mixture from sticking too much to your hands, run them under cold water and dry them before you start rolling. This will help keep the mixture cool and manageable.
2. Scoop and Roll: Use a small cookie scoop or a tablespoon to portion out the mixture evenly. Scoop the mixture and roll it into a ball between your palms. Aim for a size similar to a one-inch round ball; this makes for an ideal bite-sized treat.
3. Use Gloves: If you prefer, wear disposable gloves while rolling the truffles. This prevents them from getting too warm and helps maintain the shape.
4. Chill Again: After rolling all the truffles, place them on a parchment-lined baking sheet and return them to the freezer for about 30 minutes. This step firms them up, making them easier to coat in chocolate later.
Freezing the Truffles
Freezing is crucial for achieving the right texture in your truffles. The cold temperature not only firms up the yogurt and strawberry mixture but also helps it hold its shape during the chocolate coating process.
Importance of Freezing Time for the Perfect Texture
– Initial Freeze: After rolling, ensure that the truffles are frozen for at least 30 minutes. This initial freeze allows the yogurt base to solidify, making it less likely to melt when coated in chocolate.
– Final Freeze: After coating in chocolate, return the truffles to the freezer. This ensures that the chocolate sets perfectly and that the truffles remain frozen until you’re ready to serve them.
Melting the Chocolate
To achieve a smooth and glossy finish on your truffles, melting the chocolate properly is essential. Here are some best practices to avoid seizing or burning the chocolate.
Best Practices to Avoid Seizing and Achieve a Smooth Finish
1. Use a Double Boiler: This method provides gentle, even heat. Fill a pot with an inch of water, bring it to a simmer, and place a heatproof bowl on top, ensuring the bottom does not touch the water. Add your chopped chocolate into the bowl and stir until melted.
2. Microwave Melting: If you prefer using a microwave, place chopped chocolate in a microwave-safe bowl. Heat in 30-second intervals, stirring between each, until fully melted. Be cautious not to overheat, as chocolate can seize quickly.
3. Add a Fat: If your chocolate is too thick, add a teaspoon of coconut oil or vegetable shortening to achieve a smoother consistency. This will help the chocolate coat better and add a shine to the finished product.
Coating the Truffles
Coating the truffles in chocolate not only adds flavor but also a satisfying crunch. Here’s how to ensure an even chocolate coating.
Strategies for an Even Chocolate Coating
1. Dip Method: Use a fork or a skewer to dip each truffle into the melted chocolate. Allow excess chocolate to drip off before placing it back on the parchment paper.
2. Spoon Method: Alternatively, use a teaspoon to scoop chocolate over the truffles, ensuring they are completely covered. This method can be less messy and offers more control over the coating.
3. Decorate While Wet: If you plan to add toppings like crushed nuts, sprinkles, or shredded coconut, do this immediately after coating the truffles while the chocolate is still wet. This ensures the toppings adhere properly.
Adding Toppings
Get creative with your toppings to make each truffle unique. Here are some fun and tasty ideas:
Creative Ideas for Personalizing Each Truffle
1. Nuts: Roll in crushed almonds, hazelnuts, or walnuts for extra crunch.
2. Coconut Flakes: Shredded coconut can add a tropical flair to your truffles.
3. Sprinkles: Colorful sprinkles can make your truffles visually appealing, perfect for festive occasions.
4. Matcha Powder: For a touch of earthy flavor and a pop of green, dust with matcha powder.
5. Sea Salt: A sprinkle of flaky sea salt can enhance the chocolate flavor and add a gourmet touch.
Serving Suggestions
Now that your decadent frozen chocolate strawberry yogurt truffles are ready, it’s time to think about how to present them and what to pair them with.
Presentation Ideas
1. Elegant Platter: Arrange the truffles on a beautiful serving platter, grouping them by topping type or color for a stunning visual effect.
2. Individual Cups: Serve each truffle in small, decorative cupcake liners for a charming touch, making it easy for guests to grab and enjoy.
3. Garnish: Place fresh strawberries or mint leaves around the truffles on the platter for a fresh contrast and vibrant color.
Pairing Recommendations
1. Beverages: Pair the truffles with a glass of sparkling wine for a sophisticated touch. Alternatively, a rich cup of coffee or latte complements the sweet chocolate perfectly.
2. Dessert Board: Include the truffles as part of a dessert board alongside cheese, fruits, and other small desserts for an enticing spread.
Nutritional Information
Understanding the nutritional benefits of the ingredients used in the truffles can enhance your enjoyment of this treat.
Breakdown of Nutritional Benefits
– Strawberries: These berries are low in calories and high in vitamin C, antioxidants, and fiber, making them a healthy addition to the truffles.
– Greek Yogurt: A great source of protein and probiotics, Greek yogurt adds creaminess without excessive fat, contributing to gut health.
– Dark Chocolate: Rich in antioxidants and minerals, dark chocolate can improve heart health and reduce inflammation when consumed in moderation.
Discussing the Balance of Indulgence and Health
While these truffles are a sweet treat, they also incorporate healthier ingredients, making them a more guilt-free indulgence. You can enjoy them knowing they provide nutritional benefits along with that satisfying chocolatey experience.
Conclusion
Creating decadent frozen chocolate strawberry yogurt truffles is not only a rewarding experience but also a delightful way to treat yourself and others. Each bite offers a perfect balance of creamy and fruity flavors, wrapped in a luscious chocolate coating.
We encourage you to try making these truffles at home for a refreshing and satisfying dessert that’s perfect for any occasion. Their versatility and appeal make them suitable for gatherings, celebrations, or just a sweet moment to indulge yourself. With the tips and techniques provided, you’ll be able to craft these delightful treats that are sure to impress. Enjoy the joy of making and sharing these delicious frozen chocolate strawberry yogurt truffles!
