
Introduction
Discover the joy of homemade baking with our Sweet Strawberry Dreams Pop Tarts recipe. This delightful treat combines a flaky pastry with a luscious strawberry filling, topped off with a sweet icing that brings a touch of nostalgia to your kitchen. Perfect for breakfast, brunch, or dessert, these pop tarts not only satisfy your sweet tooth but also offer a fun and interactive baking experience. In this article, we will guide you through the process of making these delicious pastries from scratch, exploring the ingredients, techniques, and tips to ensure your pop tarts turn out perfectly every time.
Homemade pop tarts are a delightful twist on a classic treat that often evokes memories of childhood breakfasts. While store-bought options can be convenient, making them from scratch allows you to control the quality of ingredients and customize flavors to suit your palate. With layers of flaky pastry and a vibrant strawberry filling, these pop tarts are sure to impress family and friends alike.
Understanding the Ingredients
To create the perfect Sweet Strawberry Dreams Pop Tarts, it’s essential to understand the key components that contribute to their delightful flavor and texture. Each ingredient plays a significant role in making these pastries not just tasty, but also visually appealing.
The Pastry
The foundation of any great pop tart is the pastry. Here’s a closer look at the critical elements that make up this delicious crust:
– All-Purpose Flour: The primary ingredient for the pastry, all-purpose flour provides the necessary structure. It contains a balanced amount of protein, which is crucial for developing gluten. This gluten formation gives the dough its strength, allowing it to hold its shape during baking while still being tender.
– Unsalted Butter: The role of unsalted butter in achieving a flaky texture cannot be overstated. When cold butter is cut into the flour, it creates small pockets of fat that melt during baking, resulting in a flaky and tender crust. Using unsalted butter also allows for better control over the salt content in the recipe.
– Sugar and Salt: Both sugar and salt enhance the flavor of the pastry. Sugar adds a subtle sweetness that balances the tartness of the strawberry filling, while salt elevates the overall taste and helps to bring out the flavors of the other ingredients.
The Strawberry Filling
The filling is where the magic happens, transforming the simple pastry into something truly special. Let’s explore the key components of the strawberry filling:
– Fresh Strawberries vs. Frozen: While both fresh and frozen strawberries can be used, fresh strawberries bring a vibrant flavor and texture that enhances the overall experience. They are typically sweeter and juicier, making for a more enjoyable filling. However, if fresh strawberries are out of season, frozen strawberries can still yield delicious results—just ensure they are thawed and drained to avoid excess moisture.
– Cornstarch: This thickening agent plays a crucial role in the filling. When cooked, cornstarch helps to absorb excess moisture from the strawberries, creating a luscious, spreadable filling that won’t seep out during baking. It also gives the mixture a beautiful, glossy appearance.
– Lemon Juice: A splash of lemon juice not only adds a bright acidity that balances the sweetness of the strawberries but also enhances the overall flavor profile. The acidity helps to bring out the natural flavors of the strawberries, making the filling even more delicious.
The Icing
No pop tart is complete without a sweet icing that adds an extra layer of flavor and visual appeal. Here’s what you need to know about the icing:
– Ingredients for the Perfect Sweet Glaze: The icing is typically made with powdered sugar, milk, and vanilla extract. Powdered sugar gives the icing its sweetness and smooth texture, while milk helps to achieve the desired consistency. Vanilla extract adds a lovely depth of flavor that complements the strawberry filling beautifully.
– Optional Sprinkles: While sprinkles are not necessary, they can elevate the presentation of your pop tarts, making them more festive and appealing. Whether you choose colorful sprinkles or classic white, they can add a fun touch that makes these treats even more enjoyable.
Step-by-Step Guide to Making Sweet Strawberry Dreams Pop Tarts
Now that we understand the ingredients, let’s dive into the step-by-step process of creating these delightful pop tarts from scratch.
Creating the Pastry from Scratch
Making the Pastry
1. Prepare Your Workspace: Before you begin, ensure your workspace is clean and organized. Gather all your ingredients and tools, including a mixing bowl, pastry cutter or fork, rolling pin, and parchment paper.
2. Combine Dry Ingredients: In a large mixing bowl, whisk together 2 cups of all-purpose flour, 1/4 cup of granulated sugar, and 1/2 teaspoon of salt. This blend of dry ingredients will form the base of your pastry and ensures even distribution of flavors.
3. Cut in the Butter: Next, take 1 cup (2 sticks) of cold unsalted butter and cut it into small cubes. Add the butter to the flour mixture. Using a pastry cutter or fork, cut the butter into the flour until the mixture resembles coarse crumbs. Be careful not to overwork the dough; you want to maintain small pieces of butter to achieve that flaky texture.
4. Add Liquid: Gradually add 4 to 6 tablespoons of ice-cold water, one tablespoon at a time, mixing gently until the dough starts to come together. The key is to add just enough water to hold the dough together without making it sticky.
5. Chill the Dough: Once the dough has formed, divide it in half and shape each half into a rectangle. Wrap the rectangles in plastic wrap and refrigerate for at least 30 minutes. Chilling the dough is essential for flakiness, as it solidifies the butter, preventing it from melting too quickly during baking.
Preparing the Strawberry Filling
1. Cook the Strawberries: In a medium saucepan, combine 2 cups of chopped fresh strawberries, 1/4 cup of granulated sugar, 1 tablespoon of lemon juice, and 1 tablespoon of cornstarch. Cook over medium heat, stirring frequently, until the mixture begins to bubble and thicken, about 5-10 minutes.
2. Cool the Filling: Once the filling has thickened, remove it from the heat and let it cool completely. Cooling the filling is crucial as it prevents the warm mixture from melting the pastry during assembly.
Rolling Out the Pastry
1. Roll the Dough: After chilling, remove one piece of dough from the refrigerator. On a lightly floured surface, roll out the dough into a rectangle, about 1/8 inch thick. Aim for a consistent thickness to ensure even baking.
2. Cut the Pastry: Using a sharp knife or a pastry cutter, cut the rolled-out dough into rectangles measuring approximately 3 inches by 4 inches. These will be the top and bottom layers of your pop tarts.
3. Repeat with Second Dough: Repeat the rolling and cutting process with the second piece of dough, ensuring you have an equal number of top and bottom pieces.
With the pastry and filling prepared, you’re just a few steps away from assembling and baking your Sweet Strawberry Dreams Pop Tarts. In the next section, we’ll cover the assembly process and baking instructions to bring this delightful recipe to life. Stay tuned for tips and tricks to make your pop tarts truly shine!
{{image_2}}
Tools That Make the Process Easier
Before diving into the assembly of your Sweet Strawberry Dreams Pop Tarts, it’s essential to gather some handy tools to streamline your baking experience. Here’s a list of tools that will enhance your efficiency and make the process smoother:
1. Rolling Pin: A good-quality rolling pin is critical for achieving an even dough thickness. It allows you to roll out the pastry without tearing it.
2. Pastry Cutter or Bench Scraper: These tools help in cutting the dough into uniform rectangles, ensuring that each pop tart is the same size.
3. Baking Sheet: A sturdy baking sheet is essential for placing your pop tarts in the oven. Consider lining it with parchment paper for easy cleanup.
4. Pastry Brush: This will be useful for applying egg wash to your pop tarts before baking, giving them that beautiful golden color.
5. Fork: A fork is handy for sealing the edges of the pop tarts and creating decorative patterns on the surface.
6. Piping Bag: If you want to add icing in a precise manner, a piping bag with a small round tip is beneficial.
7. Cooling Rack: After baking, a cooling rack ensures that your pop tarts cool evenly without becoming soggy.
Assembling the Pop Tarts
Now that you have your tools ready, it’s time to assemble your pop tarts. Follow these steps carefully to ensure a delightful result.
Tips for Portioning the Filling to Avoid Overflow
When filling your pop tarts, it’s crucial to avoid overfilling them, as this can lead to messy overflow during baking. Here are some tips:
– Use a Measuring Spoon: Fill each rectangle with about 1 to 2 tablespoons of strawberry filling. This amount is generally sufficient and helps prevent overflow.
– Leave Space at the Edges: Be sure to leave at least a 1/2 inch border around the edges of the dough when adding the filling. This space is necessary for sealing the edges properly.
Importance of Sealing and Venting for Optimal Baking Results
Sealing your pop tarts is essential for keeping the filling contained during baking. Here’s how to do it effectively:
– Seal the Edges: After placing the top layer of dough over the filling, use your fingers to press down the edges. Then, use a fork to crimp the edges securely. This not only helps seal the pop tarts but also adds an attractive design.
– Vent the Pop Tarts: To prevent the filling from bursting out during baking, use a sharp knife to cut small slits in the top of each pop tart. This allows steam to escape and ensures even cooking.
Baking the Pop Tarts
Once your pop tarts are assembled, it’s time to bake them. Proper baking is key to achieving a flaky, golden crust.
How to Know When Your Pop Tarts Are Perfectly Baked
Baking time can vary, but here are some signs that your pop tarts are ready:
– Golden Brown Color: The tops of the pop tarts should be a lovely golden brown. If they are still pale, they likely need more time in the oven.
– Firm to the Touch: Gently press the tops; they should feel firm, not doughy. If they bounce back, they are likely done.
Understanding Oven Temperatures and Their Effect on Baking
Baking at the right temperature is essential for the best results. Here’s what you need to know:
– Preheat Your Oven: Always preheat your oven to 375°F (190°C) before placing your pop tarts inside. This helps create an even baking environment.
– Check for Hot Spots: If your oven has hot spots (areas that are hotter than others), rotate the baking sheet halfway through the baking time to ensure even browning.
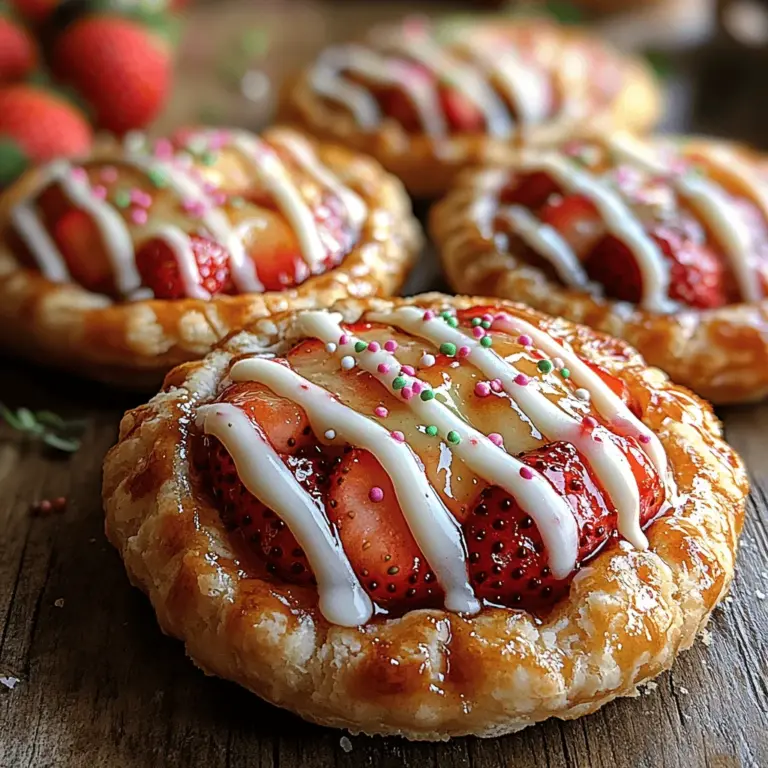
The Art of Icing and Decorating
A pop tart isn’t complete without a delicious icing and some decorative flair. Let’s explore how to prepare the icing and apply it beautifully.
Preparing the Icing
Creating the perfect icing is simple with a few steps:
– Achieving the Right Consistency for Drizzling: Combine powdered sugar with a small amount of milk or water until you achieve a thick yet pourable consistency. You want it to be able to drizzle off a spoon but not too runny that it drips off completely.
– Flavor Variations for the Icing: While vanilla is classic, consider adding a splash of almond extract or a few drops of strawberry puree for a flavor twist. You can also tint your icing with food coloring for added visual appeal.
Icing and Decorating Techniques
Now that your icing is ready, it’s time to apply it to your pop tarts:
– Best Practices for Applying Icing Without Making a Mess: Use a piping bag or a squeeze bottle to drizzle the icing over the cooled pop tarts. This allows for more control and less mess compared to using a spoon.
– Ideas for Creative Decorations to Elevate Your Pop Tarts: Consider adding colorful sprinkles, crushed nuts, or edible glitter on top of the icing before it sets. You can even use fresh strawberries or chocolate shavings for a more decadent touch.
Storage and Serving Suggestions
Once your Sweet Strawberry Dreams Pop Tarts are all iced and decorated, you might wonder how to enjoy them best or how to store any leftovers.
How to Enjoy Your Sweet Strawberry Dreams Pop Tarts
These pop tarts are perfect for breakfast, snacks, or even dessert. Here are some serving ideas:
– Pairing Suggestions for a Complete Breakfast or Snack: Serve your pop tarts with a side of fresh fruit, yogurt, or a glass of chilled milk. They also pair well with a hot cup of coffee or tea for a delightful afternoon treat.
– Creative Ways to Incorporate Pop Tarts Into Desserts: Crumble your pop tarts over ice cream for a fun dessert topping or layer them in a parfait with whipped cream and strawberries for an eye-catching dessert.
Storing Your Pop Tarts
To ensure your homemade pop tarts stay fresh:
– Best Methods for Keeping Pop Tarts Fresh: Store them in an airtight container at room temperature for up to 3 days. If you prefer, you can refrigerate them to extend their shelf life by a few days.
– Tips for Reheating Without Losing Texture: To regain that freshly baked texture, reheat your pop tarts in a toaster or an oven at 350°F (175°C) for about 5-10 minutes. Avoid using the microwave, as it can make the pastry soggy.
Conclusion
Homemade Sweet Strawberry Dreams Pop Tarts are not only a treat for the taste buds but also a delightful activity for home bakers of all levels. By following this detailed guide, you can create a deliciously flaky pastry filled with fresh strawberries and topped with a sweet icing. The satisfaction of enjoying your own homemade pop tarts is unparalleled, making it a perfect recipe to share with family and friends. Whether served fresh or stored for later, these pop tarts are sure to become a beloved staple in your recipe collection. Happy baking!
