
Delight in a dessert that’s not only visually stunning but also a breeze to prepare: the Berry Bliss No-Bake Cheesecake Jars. This recipe combines the creamy richness of cheesecake with the freshness of mixed berries, all served in charming individual jars. Perfect for gatherings, special occasions, or simply indulging yourself, these jars are a testament to how simple ingredients can create an extraordinary treat. The delightful combination of flavors and textures makes this dessert not only a feast for the taste buds but also a treat for the eyes.
In this article, we will explore the various components of the recipe, offer insights into its preparation, and discuss the appeal of no-bake desserts. Whether you’re a seasoned baker or a novice in the kitchen, this easy-to-follow recipe will ensure you achieve a deliciously satisfying dessert that is bound to impress.
Understanding the No-Bake Cheesecake
The Concept of No-Bake Cheesecake
No-bake cheesecakes have gained immense popularity in recent years, and for good reason. Unlike traditional cheesecakes that require baking, no-bake versions rely on the cooling and setting properties of cream cheese and whipped cream to achieve that desired creamy texture. This method not only simplifies the process but also allows for a lighter, airier dessert that melts in your mouth.
There are several benefits to preparing no-bake desserts. For one, they eliminate the need for an oven, making them perfect for hot summer days when you want to avoid heating up the kitchen. Additionally, no-bake cheesecakes can typically be made in advance, allowing flavors to meld beautifully while they sit in the refrigerator. This makes them an ideal choice for parties or gatherings where you want to minimize last-minute preparation.
The versatility of cheesecake recipes is another advantage of the no-bake method. You can experiment with various flavors, toppings, and crusts, ensuring that there’s something for everyone. From fruity to chocolatey, the possibilities are endless.
Why Choose Individual Jars?
One of the most appealing aspects of the Berry Bliss No-Bake Cheesecake Jars is the individual serving size. Single-serving desserts have become increasingly popular for a number of reasons. Firstly, they provide a perfect portion control solution, allowing each guest to enjoy their own dessert without the temptation to dive into a large cake. This is especially beneficial for those who wish to indulge without overdoing it.
Moreover, serving desserts in jars adds a touch of charm and elegance, elevating the dessert experience. The transparent glass showcases the beautiful layers of creamy cheesecake and vibrant berries, creating an eye-catching presentation. Individual jars also make it easier to transport desserts for picnics or potlucks, simplifying serving and cleanup.
Ingredients Breakdown
Essential Ingredients Overview
To create the delectable Berry Bliss No-Bake Cheesecake Jars, a few essential ingredients come together harmoniously. Understanding the role of each ingredient will help you appreciate the final product even more.
A Closer Look at Graham Cracker Crumbs
The crust of the cheesecake jars is a fundamental component that provides structure and texture. Graham cracker crumbs are the star of the crust, offering a sweet, slightly nutty flavor that complements the creamy filling. When selecting graham crackers, opt for high-quality options without added preservatives for the best taste. If you’re feeling adventurous, consider using flavored graham crackers, such as chocolate or cinnamon, to add a unique twist to the crust.
The Role of Unsalted Butter in the Crust
Unsalted butter plays a crucial role in binding the graham cracker crumbs together, creating a rich and buttery crust. By using unsalted butter, you can control the saltiness of the dessert, allowing the natural flavors of the ingredients to shine. When melting the butter, ensure that it is just warm enough to mix with the crumbs without becoming too hot, which can affect the texture of the crust.
Understanding the Significance of Cream Cheese and Heavy Whipping Cream
The creamy filling of the cheesecake jars is made primarily from cream cheese and heavy whipping cream. Cream cheese provides the rich, tangy flavor characteristic of traditional cheesecake while also contributing to the smooth texture. It’s essential to use full-fat cream cheese for the best results, as low-fat or light options may not yield the same creamy consistency.
Heavy whipping cream, when whipped to soft peaks, adds lightness and volume to the cheesecake filling. This fluffy texture is what makes no-bake cheesecakes so indulgent and satisfying. Be sure to use cold heavy cream for optimal whipping results.
Sweeteners in the Recipe
Comparing Granulated Sugar and Powdered Sugar
Sweetness is a key element in any dessert, and this recipe allows you to choose between granulated sugar and powdered sugar. Granulated sugar is commonly used in baking and can be incorporated directly into the cream cheese filling. However, powdered sugar, which is finely ground and contains a small amount of cornstarch, dissolves more easily, resulting in a smoother texture for your cheesecake filling.
If you prefer a creamier finish, powdered sugar is often the better choice for no-bake cheesecakes as it blends seamlessly into the cream cheese without creating a grainy texture. Consider your desired level of sweetness and texture when selecting your sweetener.
The Star of the Show: Mixed Berries
Nutritional Benefits of Berries
The mixed berries in this recipe not only add a burst of vibrant color but also offer a wealth of nutritional benefits. Berries such as strawberries, blueberries, raspberries, and blackberries are rich in antioxidants, vitamins, and minerals. They are low in calories and high in fiber, making them a healthy addition to any dessert.
Incorporating berries into your no-bake cheesecake not only enhances the flavor but also allows you to indulge in a delicious treat that is packed with nutrients. The natural sweetness of ripe berries eliminates the need for excessive added sugars, creating a balanced dessert option.
Tips for Selecting and Using Fresh Berries
When it comes to choosing fresh berries, quality is key. Look for berries that are plump, firm, and free from blemishes. Opt for seasonal and locally sourced berries when possible, as they tend to be fresher and more flavorful. If fresh berries are unavailable, frozen berries can be used as a substitute; just be sure to thaw and drain them before adding to the cheesecake jars to avoid excess moisture.
In addition to layering the berries in the jars, consider creating a berry compote by gently cooking the berries with a bit of sugar on the stovetop. This will intensify their flavor and create a luscious topping for your cheesecake jars.
Step-by-Step Preparation
Preparing the Crust
Now that we have a good understanding of the ingredients, let’s dive into the preparation process for the Berry Bliss No-Bake Cheesecake Jars. The first step is to prepare the crust, which is essential for providing a sturdy base for the creamy filling.
1. Crush the Graham Crackers: Begin by placing the graham crackers in a large zip-top bag and using a rolling pin to crush them into fine crumbs. You can also use a food processor if you have one available. The goal is to achieve a texture similar to sand.
2. Mix with Melted Butter: In a mixing bowl, combine the crushed graham crackers with melted unsalted butter. Stir until the crumbs are evenly coated and resemble wet sand. The mixture should hold together when pressed.
3. Press into Jars: Using a tablespoon or your fingers, evenly distribute the graham cracker mixture into the bottom of each jar. Press firmly to create a compact crust that will hold together once set. Be sure to create an even layer to ensure that each jar has the same delicious crust.
Creating the Cheesecake Filling
Once the crust is prepared, it’s time to create the creamy cheesecake filling that will elevate this dessert to new heights.
1. Soften the Cream Cheese: Before mixing, ensure that the cream cheese is at room temperature. This step is crucial for achieving a smooth and creamy texture. If the cream cheese is too cold, it may result in lumps in your filling.
2. Mix Cream Cheese and Sugar: In a large mixing bowl, beat the softened cream cheese with your chosen sweetener—granulated sugar or powdered sugar. Use an electric mixer on medium speed until the mixture is smooth and creamy, scraping down the sides of the bowl as needed.
3. Incorporate Heavy Whipping Cream: In a separate bowl, pour in the cold heavy whipping cream. Using a clean whisk or electric mixer, whip the cream until soft peaks form. Gently fold the whipped cream into the cream cheese mixture, taking care not to deflate the whipped cream. This will ensure a light and airy filling.
4. Layer the Filling: Once the filling is well combined, spoon or pipe the cheesecake mixture into the jars over the prepared crust. Fill each jar about two-thirds full, leaving space for the mixed berries on top.
This step-by-step approach ensures that your Berry Bliss No-Bake Cheesecake Jars will turn out beautifully, with a delightful balance of flavors and textures.
Stay tuned for the next part of this article, where we will explore the final touches, including the addition of mixed berries and tips for achieving the best results with your no-bake cheesecake jars.
{{image_2}}
Understanding the Science of Whipping Cream
Whipping cream is a fundamental component of the Berry Bliss No-Bake Cheesecake Jars. The process of whipping cream introduces air into the liquid, creating a light and fluffy texture that is essential for achieving the perfect cheesecake filling. When cream is whipped, the fat molecules start to clump together, trapping air bubbles and increasing the volume. This transformation is essential for achieving the right consistency in your cheesecake jars.
Tips for Achieving Stiff Peaks
To achieve stiff peaks while whipping cream, follow these essential tips:
1. Use Cold Cream: Start with cold heavy whipping cream. Cold cream whips better because the fat molecules are more stable at lower temperatures, allowing for a fluffier texture.
2. Choose the Right Bowl: Use a clean, dry mixing bowl. A metal or glass bowl is preferable as they help maintain the cold temperature of the cream.
3. Start Slow: Begin whipping on a low speed to incorporate air gradually, then increase to medium-high speed until you see soft peaks. This gradual approach prevents splattering and helps maintain volume.
4. Monitor Closely: Stop whipping as soon as you see stiff peaks forming. Over-whipping can lead to butter formation, which will affect the texture of your cheesecake.
5. Add Stabilizers: If you’re concerned about the cream deflating, consider adding a stabilizer such as cornstarch or gelatin, which helps maintain volume and structure.
Combining the Mixtures
Once you have whipped your cream to the perfect consistency, it’s time to combine it with the other components of your cheesecake filling. This step is crucial for achieving a harmonious blend of flavors and textures.
The Technique of Folding: What It Is and Why It Matters
Folding is a gentle mixing technique that combines lighter ingredients, like whipped cream, with denser mixtures, such as cream cheese. The goal of folding is to maintain the airy texture of the whipped cream while incorporating it into the heavier mixture.
To fold properly:
1. Add a Dollop: Start by adding a small amount of the whipped cream into the cream cheese mixture. This lightens the cream cheese and makes it easier to combine.
2. Cut and Turn: Use a spatula to cut through the mixture and then turn it over. Rotate the bowl as you do this, allowing the ingredients to fold together without losing air.
3. Repeat: Continue adding whipped cream in increments, folding gently until fully incorporated. This technique ensures your cheesecake filling remains light and airy.
Maintaining Volume for a Light Texture
Maintaining volume is essential for achieving that light, creamy texture we all love in a no-bake cheesecake. The key is to be gentle during the folding process. Avoid vigorous stirring, which can deflate the whipped cream and lead to a denser filling.
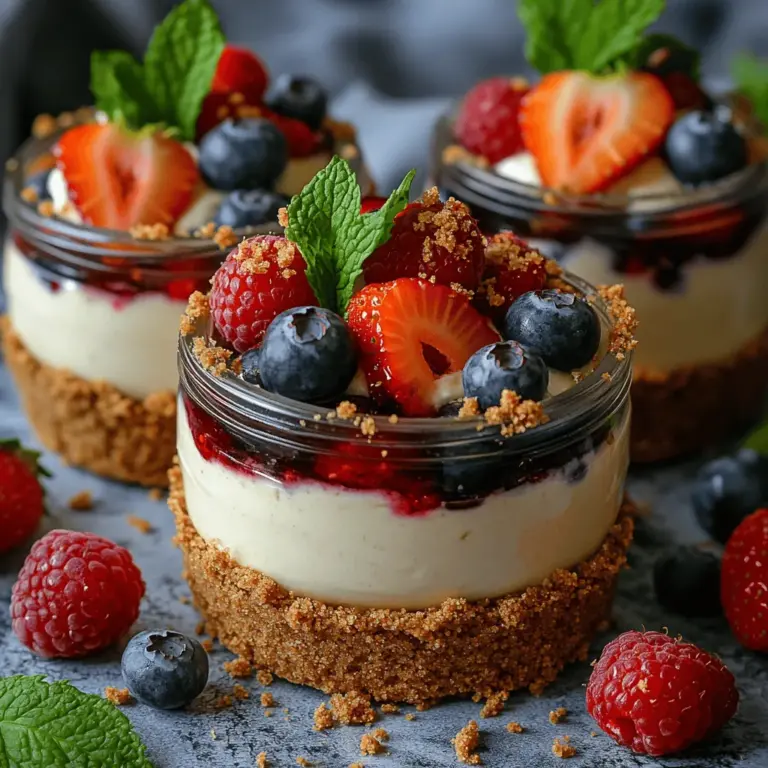
Layering the Cheesecake in Jars
Now that you have your cream cheese filling ready, it’s time to assemble the Berry Bliss No-Bake Cheesecake Jars. Layering is not only practical but also adds to the visual appeal of your dessert.
Step-by-Step Guidance on Layering
1. Start with the Crust: Spoon a layer of the prepared crust mixture into the bottom of each jar. Use the back of a spoon or your fingers to press it down firmly.
2. Add the Cheesecake Filling: Next, add a generous layer of the cheesecake filling over the crust. Use a piping bag or a spoon to create a smooth layer.
3. Top with Berries: Add a layer of mixed berries on top of the cheesecake filling. Be creative—alternate between layers of berries and filling for a striking visual effect.
4. Repeat: Continue layering until you reach the top of the jar, finishing with a layer of berries for an attractive presentation.
Visual Appeal: Arranging Berries and Cheesecake
The arrangement of the berries in your cheesecake jars can elevate the overall presentation. Consider the following tips:
– Variety: Use a mix of strawberries, blueberries, and raspberries for a colorful and vibrant look.
– Patterns: Arrange the berries in a pattern, such as a swirl or stripes, to create an eye-catching design.
– Spacing: Leave some space between layers to showcase the distinct layers of crust, filling, and fruit.
Chilling and Serving Suggestions
The Importance of Chilling
Chilling is a crucial step in preparing your no-bake cheesecake jars. It allows the filling to set properly, ensuring that every bite is creamy and holds its shape.
– Why Refrigeration Is Crucial: The refrigeration process helps the gelatin (if used) to set and the filling to firm up, creating a delightful texture that is both stable and creamy.
– Optimal Chilling Times: For the best results, chill your cheesecake jars in the refrigerator for at least 4 hours. If possible, overnight chilling is recommended for enhanced flavor and texture.
Presentation Tips for Serving
When it’s time to serve your Berry Bliss No-Bake Cheesecake Jars, presentation matters just as much as taste:
– Garnish Creatively: Top each jar with a sprig of mint or a dusting of powdered sugar for a touch of elegance.
– Serve with Accompaniments: Consider serving your jars with a side of extra berry compote or a drizzle of chocolate sauce for an indulgent experience.
– Use Attractive Jars: Choose transparent jars to showcase the beautiful layers of your cheesecake, enhancing visual appeal and enticing your guests.
Nutritional Information
Understanding the nutritional content of your Berry Bliss No-Bake Cheesecake Jars can help balance indulgence with nutrition.
Caloric Breakdown of Berry Bliss No-Bake Cheesecake Jars
Each serving of these delightful cheesecake jars typically contains around 250-300 calories, depending on the specific ingredients used and portion sizes.
Understanding Serving Sizes
A standard serving size for these cheesecake jars is about 1 cup. This portion allows you to enjoy the richness of the cheesecake while keeping an eye on your overall caloric intake.
Balancing Indulgence with Nutrition
While these jars are a treat, they can also be made healthier by adjusting certain ingredients, such as using low-fat cream cheese or reducing added sugars. Balancing indulgence with nutrition is key to enjoying desserts guilt-free.
Variations and Customizations
Exploring Flavor Variations
One of the best aspects of no-bake cheesecakes is their versatility. Here are some ideas for flavor variations:
– Fruit Flavors: Experiment with different fruits like peaches, mangoes, or cherries to create unique flavor profiles.
– Chocolate Lovers: Add cocoa powder to the cream cheese mixture for a chocolate cheesecake version or top with chocolate shavings.
– Nutty Additions: Incorporate crushed nuts into the crust or as a topping for added texture and flavor.
Dietary Modifications
If you have dietary restrictions, there are simple modifications you can make:
– Gluten-Free: Use gluten-free graham crackers or nut-based crust alternatives to make this dessert suitable for gluten-sensitive individuals.
– Dairy-Free: Substitute cream cheese with a dairy-free alternative like cashew cheese and use coconut whipped cream for the topping.
– Adjusting Sweetness: Use natural sweeteners like maple syrup or agave nectar to cater to different sweetness preferences.
Conclusion
The Berry Bliss No-Bake Cheesecake Jars are not just a dessert; they are an experience that combines simplicity with elegance. By understanding each element of the recipe—from the crust to the creamy filling, and the vibrant berries—we can appreciate the artistry of creating this delightful treat. Whether for a celebration or a quiet evening at home, these jars promise to bring joy and satisfaction to every bite. Embrace the ease of no-bake desserts and indulge in the fresh, sweet flavors of this delightful cheesecake. Enjoy the process, and let the Berry Bliss No-Bake Cheesecake Jars become a staple in your dessert repertoire!
