Homemade chicken fingers have a special place in many households—beloved by children and adults alike. The appeal of crafting your own crispy chicken strips lies not just in the taste but also in the satisfaction of creating a meal that resonates with fond memories. Whether served as a fun dinner option, a snack for kids, or a party appetizer, chicken fingers are known for their versatility and universal appeal. In this recipe for Crunchy Delight Panko Chicken Fingers, we will explore how to elevate this classic dish by using panko breadcrumbs, which are the secret to achieving that irresistibly crunchy texture.
Panko, a type of flaky breadcrumb that originated in Japan, is specifically designed to create a lighter, crispier coating compared to traditional breadcrumbs. This unique texture allows the chicken fingers to achieve a delightful crunch that holds up even when dipped in sauces. Not only does panko provide superior texture, but it also absorbs less oil during frying, resulting in a less greasy final product. This is particularly important when making chicken fingers at home, as it allows you to indulge without feeling weighed down by the heaviness often associated with fried foods.
The Crunchy Delight Panko Chicken Fingers recipe is not only about the perfect crunch; it also embodies the essence of family-friendly cooking. It invites participation from all ages, making it an ideal dish for cooking together. From seasoned home cooks to kitchen novices, everyone can join in the fun of dredging, dipping, and breading. Plus, these chicken fingers can easily be customized with various seasonings and dipping sauces to suit your family’s preferences.
Understanding the Ingredients
To make the Crunchy Delight Panko Chicken Fingers, you’ll need a handful of key ingredients. Each plays a vital role in ensuring that your chicken fingers are not only crispy but also flavorful and satisfying.
Chicken Breast: Choosing the Best Cuts
The foundation of any chicken finger recipe is, of course, the chicken itself. For this dish, boneless, skinless chicken breasts are an excellent choice due to their tenderness and mild flavor. When selecting chicken breasts, look for cuts that are plump and fresh, with a pink hue and minimal fat. If you’re feeling adventurous, you could also use chicken thighs for a juicier option, but breasts are the classic choice for this recipe.
All-Purpose Flour: Role in the Breading Process
All-purpose flour serves as the first layer of the breading process. It provides a base that helps the egg wash adhere to the chicken, ensuring that the panko breadcrumbs stick effectively. When choosing flour, any standard all-purpose variety will work well. However, for those looking to enhance the flavor, you can consider using seasoned flour, which can add an extra dimension to your chicken fingers.
Eggs: Importance in Binding
Eggs are crucial in this recipe as they act as a binding agent. They help to ensure that the breadcrumbs cling to the chicken, creating that desired crunchy coating. For optimal results, use large eggs and whisk them until fully blended. This will help create an even coating that enhances the overall texture of the chicken fingers.
Panko Breadcrumbs: Difference from Regular Breadcrumbs
Panko breadcrumbs are the star ingredient that takes this recipe to the next level. Unlike regular breadcrumbs, which are typically made from whole loaves of bread that are dried and ground, panko is made from bread that is baked using an electric current. This process results in larger, flakier crumbs that create a lighter and crunchier texture when cooked. When selecting panko, look for plain varieties to allow your seasonings to shine through, or try flavored options for an additional kick.
Seasonings: Enhancing Flavor
To elevate the taste of your panko chicken fingers, a blend of seasonings is essential. Garlic powder, onion powder, paprika, salt, and pepper are all excellent choices for adding depth and flavor to the chicken. The garlic and onion powders offer a subtle savory note, while paprika adds a hint of smokiness and color. Adjust the quantities to suit your taste preferences, and don’t hesitate to experiment with other spices or herbs like Italian seasoning or cayenne pepper for an extra kick.
Parmesan Cheese: Optional Ingredient for Added Depth
If you’re looking to add a touch of richness to your chicken fingers, consider incorporating grated Parmesan cheese into the panko mixture. This optional ingredient enhances the flavor profile and contributes to an even crunchier texture. Just ensure that the cheese is finely grated so that it blends seamlessly with the panko.
Overview of Frying Oil: Best Types for Frying
The choice of oil is another important aspect of frying chicken fingers. Opt for oils with a high smoke point, such as vegetable oil, canola oil, or peanut oil. These oils not only withstand high temperatures but also impart a neutral flavor that won’t overshadow the chicken. Avoid using olive oil for frying, as its low smoke point can lead to unpleasant flavors and a burnt taste.
Preparing for Cooking
Before diving into the cooking process, it’s essential to set up a well-organized dredging station. This will streamline your efforts and ensure an efficient workflow as you bread the chicken fingers. A typical dredging station consists of three shallow bowls: one filled with seasoned flour, another with the whisked eggs, and the last with the panko breadcrumbs mixed with any additional seasonings or cheese.
Tips for Effective Coating
To coat the chicken fingers effectively, it’s crucial to follow a specific sequence: first, dredge the chicken in flour, then dip it in the egg wash, and finally coat it in panko. This method creates a multi-layered crust that enhances both the flavor and the crunch.
Proper Techniques for Flour, Egg Dipping, and Breadcrumb Coating
When dredging the chicken in flour, ensure that each piece is thoroughly coated, shaking off any excess flour. This prevents clumping and ensures that the egg mixture can adhere properly. Next, dip the floured chicken into the egg, allowing any excess to drip off before transferring it to the panko. Press the chicken firmly into the breadcrumbs to ensure an even coating, and don’t forget to coat the edges. This extra attention to detail is what will help you achieve that sought-after crunch.
Explanation of Why Each Step is Crucial for Achieving the Desired Crispness
Each step in the dredging process serves a specific purpose. The flour creates a dry surface for the egg to adhere to, while the egg wash acts as a glue for the panko. The panko itself provides the texture that makes these chicken fingers so enjoyable. Skipping any of these steps can lead to a coating that falls off during cooking or lacks the desired crunch, so it’s worth taking the time to execute each step carefully.
Cooking the Chicken Fingers
Once your chicken fingers are fully breaded, it’s time to move to the cooking phase. The temperature of the oil is crucial for achieving perfectly crispy chicken fingers. Too low, and the chicken will absorb excess oil and become soggy; too high, and you risk burning the coating before the chicken is fully cooked through.
Importance of Oil Temperature
The ideal frying temperature for chicken fingers is between 350°F and 375°F. At this temperature, the panko will toast beautifully, creating that signature crispiness without overcooking the chicken inside. To maintain the right temperature, you may need to adjust the heat throughout the frying process, especially when adding multiple pieces of chicken at once.
How to Check if the Oil is Hot Enough
A simple method to check if your oil is ready is to drop a small piece of bread into the oil. If it sizzles and turns golden brown in about 30 seconds, your oil is at the right temperature for frying. Alternatively, you can use a thermometer for precision, ensuring consistent results every time.
With all these preparations and insights, you are well on your way to creating the perfect batch of Crunchy Delight Panko Chicken Fingers. In the next part of this article, we will dive into the actual cooking process and explore serving suggestions to elevate your meal even further. Stay tuned for more delicious tips!
{{image_2}}
Step-by-Step Guide to Frying Chicken Fingers
Once your chicken fingers are coated and ready to go, it’s time to fry them to perfection. Begin by heating your oil in a large skillet over medium-high heat. It’s crucial to use enough oil to allow the chicken fingers to float slightly. This ensures even cooking and achieves that desirable crunchy texture.
The Significance of Frying in Batches
Frying in batches is a critical step to ensure each piece of chicken gets the attention it deserves. Overcrowding the skillet can lower the oil temperature, resulting in soggy, greasy chicken fingers rather than the crunchy delight you aim for. Aim to fry 3-4 chicken fingers at a time, depending on the size of your skillet. This allows the oil to maintain its heat and ensures each piece is perfectly cooked.
Tips for Avoiding Overcrowding in the Skillet
To avoid overcrowding, assess the size of your skillet and the number of chicken fingers you’re preparing. If you have a large batch, consider using a second skillet or frying in smaller portions. Additionally, keep a close eye on the cooking process—if the chicken fingers seem to be steaming rather than frying, it’s a clear sign that your batch is too large.
Cooking Duration: How to Achieve the Perfect Golden-Brown Color
Cook the chicken fingers for about 3-4 minutes on each side or until they are golden brown and cooked through. The exact timing may vary depending on the thickness of the chicken strips. To achieve that perfect golden-brown color, use tongs to gently flip the chicken fingers halfway through cooking. If you’re uncertain, a meat thermometer can help. The internal temperature should reach 165°F (75°C) to ensure they are safe to eat.
Post-Cooking Process
Draining Excess Oil: Techniques for Maintaining Crispiness
Once your chicken fingers are cooked, it’s essential to drain the excess oil to maintain their crispiness. Use a slotted spoon to remove them from the skillet and place them on a plate lined with paper towels. This will help absorb any remaining oil. For an extra crunch, consider placing your fried chicken fingers on a wire rack set over a baking sheet. This allows air to circulate around them, preventing sogginess.
How to Identify When Chicken Fingers Are Done Cooking
To ensure your chicken fingers are fully cooked, look for a deep golden-brown color and an internal temperature of 165°F (75°C). The coating should be crisp, and when you cut into a piece, the juices should run clear, not pink. If you’re frying in batches, keep the cooked chicken fingers warm in a preheated oven set to low (around 200°F or 93°C) while you finish frying the remaining pieces.
Importance of Cooling Time Before Serving
Allowing your chicken fingers to cool for a few minutes before serving is crucial. This cooling period helps the coating set and enhances the flavor as the steam escapes. Serving them immediately can risk them being too hot to eat, leading to disappointment for your guests.
Serving Suggestions
Best Practices for Presentation
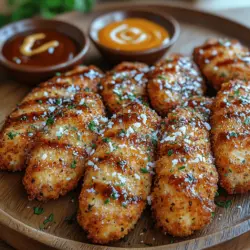
Presentation can elevate your Crunchy Delight Panko Chicken Fingers from a simple meal to an impressive dish. Start with a clean, colorful plate or platter. Arrange the chicken fingers in a fan shape or in a neat row. This not only looks appealing but also makes them easy for your guests to grab.
Creative Plating Ideas to Impress Guests
Consider adding a side of vibrant vegetables or a fresh salad to your platter. A sprinkle of fresh herbs like parsley or cilantro can add a pop of color. You could also serve the chicken fingers in a small paper cone for a fun, casual presentation, especially if you’re serving them at a party or gathering.
Garnishing Options with Fresh Herbs and Lemon Wedges
Garnishing your dish can enhance both the aesthetic and flavor. Fresh herbs such as parsley, dill, or chives can be finely chopped and sprinkled over the top for a burst of color and freshness. Adding lemon wedges not only brightens the plate but allows guests to squeeze fresh juice over the chicken fingers, enhancing their flavor.
Suggestions for Dipping Sauces
No chicken finger dish is complete without a selection of dipping sauces. Popular choices include honey mustard, BBQ sauce, and ranch dressing. These sauces provide a range of flavors that can satisfy different palates.
Overview of Popular Choices like Honey Mustard, BBQ Sauce, and Ranch Dressing
– Honey Mustard: A sweet and tangy blend that complements the crunchiness of the chicken.
– BBQ Sauce: Offers a smoky, rich flavor that pairs wonderfully with crispy chicken.
– Ranch Dressing: Creamy and herbaceous, ranch is a classic favorite that appeals to many.
Ideas for Homemade Dipping Sauces to Elevate the Meal
For a more personalized touch, consider making your own dipping sauces. Here are a few ideas:
– Spicy Garlic Aioli: Mix mayonnaise with minced garlic, lemon juice, and a pinch of cayenne for a spicy kick.
– Avocado Lime Crema: Blend ripe avocados with sour cream, lime juice, and seasonings for a creamy, zesty dip.
– Sweet Chili Sauce: Combine chili sauce with a bit of honey for a sweet and spicy option.
Nutritional Overview
Analysis of the Dish in Terms of Calories and Macronutrients
Crunchy Delight Panko Chicken Fingers are not only delicious but can also fit into a balanced diet. A typical serving (about three chicken fingers) contains approximately 350-400 calories, depending on the amount of oil used for frying. The macronutrient breakdown is roughly:
– Protein: 25-30 grams
– Fat: 20-25 grams
– Carbohydrates: 30-35 grams
Potential Variations for Healthier Options (Baking vs. Frying)
For a healthier alternative, consider baking the chicken fingers instead of frying. Preheat your oven to 425°F (220°C) and place the coated chicken fingers on a baking sheet lined with parchment paper. Spray them lightly with cooking spray, and bake for about 20-25 minutes, flipping halfway through. This method significantly reduces the calorie count and fat content while still providing a satisfying crunch.
Tips for Accommodating Dietary Restrictions (Gluten-Free, Dairy-Free Variations)
If you’re catering to specific dietary restrictions, it’s easy to adapt this recipe.
– Gluten-Free: Substitute panko breadcrumbs with gluten-free breadcrumbs or crushed gluten-free cornflakes for the coating.
– Dairy-Free: Use almond milk or any dairy-free milk alternative in place of buttermilk for the marinade.
Conclusion
Making Crunchy Delight Panko Chicken Fingers at home is not just about creating a meal; it’s about the joy of cooking and sharing delicious food with friends and family. This recipe is incredibly adaptable, allowing you to customize flavors and presentations to suit any occasion, from family dinners to casual gatherings.
With a few smart tips, you can elevate your chicken fingers to a gourmet level, impressing guests with both flavor and presentation. So, don your apron, gather your ingredients, and get ready to experiment with flavors and styles. Whether you stick to the classic recipe or explore your own variations, these chicken fingers are sure to be a hit at any table. Enjoy the process and the delicious results!