Introduction
In the world of desserts, no-bake recipes hold a special place for many home cooks. They offer a delightful solution for those busy individuals who crave a sweet treat but don’t have the time or energy to fire up the oven. No-bake desserts are not only convenient, but they also allow for creativity without the constraints of traditional baking. One such indulgent creation is the No-Bake Oreo Cookie Dough Bars, a treat that promises to tantalize your taste buds with a rich, creamy texture and a satisfying crunch.
The combination of Oreo cookies and cookie dough is a match made in dessert heaven. Each bite of these bars brings together the iconic chocolate sandwich cookie with a luscious, edible cookie dough that melts in your mouth. The simplicity of the recipe makes it accessible to bakers of all skill levels, ensuring that anyone can whip up this no-bake delight with ease. Whether you’re looking to impress guests at a gathering, satisfy your own sweet tooth, or create a fun family activity, these Oreo Cookie Dough Bars are a perfect choice.
Understanding the Ingredients
To create the perfect No-Bake Oreo Cookie Dough Bars, it’s essential to understand the ingredients that come together to form this delectable dessert. Each component plays a crucial role in achieving the desired flavor and texture, ensuring a delightful experience in every bite.
The Role of Heat-Treated Flour
One of the key ingredients in this recipe is flour, which forms the base of the cookie dough. However, it’s important to note that raw flour can pose a risk due to potential pathogens. This is where heat-treated flour comes into play. Heat-treating flour involves baking it at a low temperature to eliminate any harmful bacteria, making it safe for consumption in raw form. Not only does this process enhance safety, but it also contributes to a smoother texture in the final product. By using heat-treated flour, you can enjoy the rich taste of cookie dough without the worry of foodborne illness.
Butter and Sugars: The Foundation of Flavor
No dessert is complete without a rich, buttery base, and this recipe is no exception. Unsalted butter is mixed with both brown sugar and granulated sugar to create a flavorful foundation. The unsalted butter adds creaminess, while the brown sugar provides a hint of molasses, contributing to the overall depth of flavor. The granulated sugar enhances sweetness, ensuring that each bite is as indulgent as it is delicious. Together, these ingredients create a luscious cookie dough that serves as the backbone of the bars.
The Influence of Vanilla
Vanilla extract is often referred to as the secret ingredient in many desserts, and for good reason. In No-Bake Oreo Cookie Dough Bars, pure vanilla extract elevates the flavor profile to new heights. Its warm, aromatic notes complement the sweetness of the sugars and the richness of the butter, creating a well-rounded taste experience. Using pure vanilla extract instead of imitation vanilla is key, as it provides a more authentic and robust flavor that enhances the overall appeal of the bars.
Chocolate Chips and Oreos: The Star Ingredients
No discussion of Oreo Cookie Dough Bars would be complete without acknowledging the star ingredients: mini chocolate chips and crushed Oreos. The mini chocolate chips add bursts of sweetness that contrast beautifully with the cookie dough, while also providing a delightful texture. Moreover, the crushed Oreos not only contribute to the flavor but also add a visual appeal, creating a stunning marbled effect throughout the bars. Together, these ingredients transform a simple dessert into an irresistible treat that is sure to please any crowd.
Cream Cheese: Adding Creaminess
To achieve the perfect creamy consistency in these no-bake bars, cream cheese is an essential ingredient. It enhances the texture of the cookie dough, making it velvety smooth and rich. The subtle tanginess of cream cheese balances out the sweetness, preventing the bars from becoming overly sugary. This addition is what sets these bars apart, ensuring that each bite is filled with a delightful creaminess that complements the other flavors perfectly.
Step-by-Step Instructions for No-Bake Oreo Cookie Dough Bars
Creating No-Bake Oreo Cookie Dough Bars is a straightforward process that requires minimal time and effort. Here’s a detailed breakdown of the steps involved, ensuring you can easily follow along and achieve delicious results.
1. Prepare the Heat-Treated Flour
– Preheat your oven to 350°F (175°C).
– Spread the all-purpose flour in an even layer on a baking sheet.
– Bake for about 5-7 minutes, stirring halfway through. This process eliminates any harmful bacteria, making the flour safe for consumption.
2. Mix the Base Ingredients
– In a large mixing bowl, beat together the softened unsalted butter and both sugars (brown and granulated) until the mixture is light and fluffy. This step incorporates air, giving your bars a lighter texture.
– Add in the pure vanilla extract and mix until well combined.
3. Incorporate the Flour
– Gradually add the heat-treated flour to the butter mixture, mixing until fully incorporated. The dough should come together without being overly dry or sticky.
4. Add Cream Cheese
– In a separate bowl, beat the cream cheese until smooth. Then, fold the cream cheese into the cookie dough mixture until evenly distributed. This step ensures that the cream cheese is well blended, contributing to the overall creaminess of the bars.
5. Fold in the Chocolate Chips and Oreos
– Gently fold in the mini chocolate chips and crushed Oreos until evenly distributed. This is the moment to marvel at the beautiful combination of flavors and textures that will define your bars.
6. Prepare the Pan
– Line an 8×8-inch baking dish with parchment paper, allowing some overhang for easy removal later. This will prevent the bars from sticking to the pan and make cleanup a breeze.
7. Press the Mixture into the Pan
– Transfer the cookie dough mixture into the prepared baking dish. Using a spatula or your hands, press the mixture down firmly and evenly. This ensures that the bars hold their shape once set.
8. Chill the Bars
– Cover the dish with plastic wrap and refrigerate for at least 2 hours, or until the bars are firm. Chilling allows the flavors to meld and gives the bars their perfect texture.
By following these steps, you’ll be well on your way to creating a batch of No-Bake Oreo Cookie Dough Bars that are sure to impress. The combination of flavors and textures will leave you and your loved ones craving more, making it a dessert to remember. As you prepare to embark on this sweet adventure, remember that the key to success lies in the quality of your ingredients and the love you put into creating this delightful treat.
{{image_2}}
Mixing the Base: Achieving the Right Consistency
To create the perfect No-Bake Oreo Cookie Dough Bars, starting with a well-mixed base is essential. The creaming method is a key technique that involves beating together the butter and sugars until the mixture becomes light and fluffy. This process incorporates air into the dough, which not only enhances the texture but also contributes to a lighter, more enjoyable bite.
Begin by using room temperature butter, as this will help it cream easily with the sugars. In a large mixing bowl, combine the softened butter with both brown and granulated sugars. Beat them together using an electric mixer on medium speed for about 2-3 minutes until the mixture is pale and fluffy. This step is crucial; a well-creamed base will lead to bars that are not only delicious but also have a delightful texture.
Incorporating the Flour and Mix-Ins
After achieving the right consistency with the butter and sugars, it’s time to incorporate the flour and any additional mix-ins. To do this without overworking the dough—an important step to maintain softness—start by sifting the all-purpose flour directly into the creamed mixture. Gentle mixing is key here. Use a spatula or wooden spoon to fold the flour into the mixture, being careful not to over-mix.
Once the flour is just incorporated, add in your mix-ins, such as crushed Oreo cookies and chocolate chips. These add texture and flavor to the bars. Again, fold everything together gently until you see no dry flour. It’s important to keep the dough light and fluffy, which will help maintain the bars’ ideal texture.
Creating the Perfect Texture with Cream Cheese
Cream cheese is the secret ingredient that takes these bars to the next level. It adds a rich creaminess that balances the sweetness of the dough. To incorporate the cream cheese effectively, make sure it is softened to room temperature. This ensures it blends smoothly without lumps.
In a separate bowl, beat the cream cheese until it is smooth and creamy. Once your flour and mix-in mixture is ready, you can add the cream cheese to it. Use a spatula to gently fold the cream cheese into the dough. This folding method is essential; it prevents over-mixing and helps to retain the lightness of the mixture. Continue folding until the cream cheese is well-distributed, and the dough is smooth. A consistent mixture will yield bars that have a perfect, creamy texture.
Chilling: The Key to Firm Bars
Chilling the mixture is a critical step in making No-Bake Oreo Cookie Dough Bars. Once your mixture is well combined, transfer it to a lined baking dish and spread it out evenly. Press the dough down firmly with your hands or a spatula to ensure it holds together well.
Cover the dish with plastic wrap or aluminum foil and refrigerate for at least 2 hours. Chilling allows the bars to firm up, making them easier to slice into perfect squares. It also helps the flavors to meld together, enhancing the overall taste of the bars. The longer you chill them, the firmer they will become, so if you can resist the temptation, letting them chill overnight is ideal.
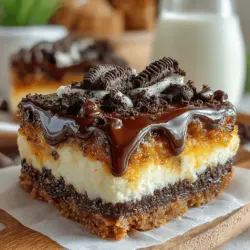
Optional Chocolate Drizzle: Elevating Presentation
To take your No-Bake Oreo Cookie Dough Bars to the next level, consider adding a chocolate drizzle. This step not only enhances the flavor but also gives a beautiful finish to your dessert.
To prepare the chocolate drizzle, you can use either chocolate chips or a bar of chocolate. Begin by chopping the chocolate or measuring out the chips into a microwave-safe bowl. Heat the chocolate in the microwave in 20-second intervals, stirring in between, until it is completely melted and smooth. Be careful not to overheat, as chocolate can burn easily.
Once melted, let the chocolate cool slightly before drizzling it over the chilled bars. You can use a spoon or a piping bag for more control. For a more artistic touch, create a zig-zag pattern across the top of the bars. Allow the chocolate to set for a few minutes before slicing the bars.
Presentation Ideas for No-Bake Oreo Cookie Dough Bars
Presentation can elevate the enjoyment of your No-Bake Oreo Cookie Dough Bars. Here are some creative serving suggestions to impress your guests:
1. Plating: Cut the bars into squares and arrange them on a decorative platter. Consider using parchment paper or decorative doilies underneath to add a touch of elegance.
2. Garnishes: Top each bar with a sprinkle of crushed Oreo cookies or a dollop of whipped cream for added flair. Fresh mint leaves can also add a pop of color and freshness.
3. Pairing with Ice Cream: Serve the bars alongside a scoop of vanilla or cookies and cream ice cream. This combination not only looks appealing but provides a delightful contrast in textures and flavors.
4. Creating Dessert Trifles: Layer pieces of the cookie dough bars with whipped cream and additional crushed Oreos in clear cups for an impressive dessert trifle.
Serving on a Decorative Platter
When serving your No-Bake Oreo Cookie Dough Bars, the way you present them can significantly enhance the overall experience. Choose a decorative platter that complements the colors of your dessert. A white platter can make the bars stand out, while a colorful one can add a festive touch.
Consider using garnishes such as chocolate shavings, edible flowers, or even a light dusting of cocoa powder around the edges of the platter for visual appeal. This will not only enhance the look of the bars but also invite guests to indulge in your delightful creation.
Pairing Suggestions
To elevate your dessert experience, consider pairing your No-Bake Oreo Cookie Dough Bars with complementary flavors. Here are some suggestions:
1. Beverage Pairings: A rich cup of coffee or a glass of cold milk pairs perfectly with the bars, enhancing the chocolatey flavor and providing a refreshing balance.
2. Fruits: Fresh berries, such as strawberries or raspberries, add a tart contrast to the sweet bars. Arrange a small bowl of mixed berries on the side for a pop of color and freshness.
3. Nutty Flavors: A handful of chopped nuts, such as pecans or walnuts, can provide a crunchy texture that contrasts nicely with the softness of the bars. Serve them on the same platter for a delightful mix.
Nutritional Information
While indulging in No-Bake Oreo Cookie Dough Bars, it’s helpful to have a brief overview of their nutritional aspects. Each serving (one square) typically contains:
– Calories: Approximately 200-250 calories (varies based on ingredients used)
– Fat: 11-14 grams
– Carbohydrates: 24-30 grams
– Protein: 2-3 grams
– Fiber: 1 gram
These bars are a treat, so it’s best to enjoy them in moderation as part of a balanced diet. The combination of ingredients provides some nutritional benefits, such as calcium from the cream cheese and energy from the sugars.
Conclusion
The joy of making No-Bake Oreo Cookie Dough Bars lies in their simplicity and the delicious flavors they offer. With no baking required, this recipe is perfect for those who want to whip up a quick yet indulgent dessert. From the creamy texture to the delightful crunch of Oreo cookies, every bite is a celebration of flavors.
Encourage yourself to experiment with the recipe by adding different mix-ins, such as nuts or different types of chocolate. This flexibility allows you to make the bars uniquely yours. Whether you’re preparing them for a special occasion or just as a treat for yourself, these bars promise to bring satisfaction and delight without the fuss of traditional baking.
So gather your ingredients, follow the steps, and indulge in the delightful world of No-Bake Oreo Cookie Dough Bars. Happy baking, or rather, happy creating!