S’mores Cheesecake Jars: A Delicious Twist on a Classic Favorite
S’mores have long been a beloved treat, evoking memories of summer nights spent around the campfire, roasting marshmallows to a perfect golden brown, and sandwiched between graham crackers and melted chocolate. This nostalgic dessert has transcended generations, reminding us of carefree moments and the simple joys of outdoor gatherings. However, as culinary creativity flourishes, traditional recipes are often reimagined into modern delights that cater to contemporary tastes and lifestyles. One such delightful innovation is the S’mores Cheesecake Jars—a delicious and visually appealing dessert that captures the essence of s’mores while offering a sophisticated twist that is perfect for any occasion.
These S’mores Cheesecake Jars are not just a treat for the taste buds; they also serve as a stunning centerpiece for gatherings, parties, or even as a sweet indulgence for yourself. With their layered presentation and rich flavors, these jars are sure to impress your guests, making them an excellent choice for birthdays, barbecues, or holiday celebrations. The beauty of this dessert lies in its versatility—whether you prefer to serve them at a casual get-together or as a sophisticated end to a dinner party, S’mores Cheesecake Jars are sure to satisfy any sweet craving.
Understanding the Elements of S’mores Cheesecake Jars
To truly appreciate the S’mores Cheesecake Jars, it’s essential to understand the key components that make this dessert so irresistible. The recipe consists of three main elements: the crust, the cheesecake filling, and the toppings. Each component plays a crucial role in achieving the perfect balance of flavors and textures.
1. The Crust: The foundation of any cheesecake, the crust is typically made from crushed graham crackers mixed with sugar and butter. This combination not only provides a crunchy texture but also infuses the dessert with the classic flavor of s’mores.
2. The Cheesecake Filling: The heart of this dessert, the cheesecake filling, is made primarily with cream cheese, which provides a rich and creamy base. The filling is enhanced with heavy whipping cream and vanilla extract, contributing to its luxurious texture and flavor.
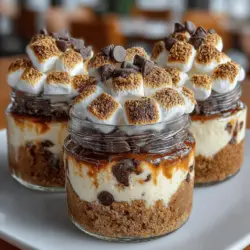
3. The Toppings: To top off this decadent dessert, a layer of toasted marshmallows and melted chocolate is added, creating a visually appealing and delicious finish. These toppings not only enhance the flavor but also bring the traditional s’mores essence to the jars.
One of the standout features of S’mores Cheesecake Jars is their no-bake nature. This means that anyone can whip up this dessert without the need for an oven, making it an ideal choice for those who may be intimidated by traditional baking methods or simply want to save time. The ease of preparation, combined with the delightful flavors, makes this recipe a must-try for dessert lovers everywhere.
Crafting the Perfect Crust
Now that we’ve set the stage for this delectable treat, let’s dive into crafting the perfect crust. The crust is a crucial element that provides stability and flavor to your S’mores Cheesecake Jars. Here’s how to get it just right.
Ingredients for the Crust
The crust for S’mores Cheesecake Jars is simple yet effective. You will need:
– Graham cracker crumbs: These form the base of your crust, providing that classic s’mores flavor.
– Granulated sugar: A touch of sweetness to balance the flavors.
– Unsalted butter: This ingredient binds the crumbs together and adds richness.
Step-by-Step Guide to Achieve the Ideal Crust Texture
1. Crush the Graham Crackers: Start by finely crushing the graham crackers. You can use a food processor for a quick and even result or place them in a zip-top bag and crush them with a rolling pin. Aim for fine crumbs, as larger pieces may not bind well.
2. Mix the Dry Ingredients: In a mixing bowl, combine the graham cracker crumbs and granulated sugar. Stir until well combined, ensuring the sugar is evenly distributed throughout the crumbs.
3. Melt the Butter: In a small microwave-safe bowl or on the stovetop, melt the unsalted butter until completely liquefied. Allow it to cool slightly before adding it to the crumb mixture.
4. Combine the Mixtures: Pour the melted butter into the graham cracker and sugar mixture. Use a fork or your hands to mix until the crumbs are thoroughly coated with butter. The mixture should have a texture similar to wet sand.
5. Press Firmly into Jars: Once your crust mixture is ready, it’s time to assemble. Spoon the crust into the bottom of your jars, making sure to press it firmly into an even layer. This step is vital to ensure that the crust holds its shape and provides a stable base for the cheesecake filling.
6. Chill the Crust: For the best results, place the jars in the refrigerator for about 10-15 minutes to allow the crust to set before adding the cheesecake filling. This will help it firm up and create a delightful contrast with the creamy filling.
By following these steps, you’ll create a perfectly crunchy and flavorful crust that sets the foundation for your S’mores Cheesecake Jars. The combination of graham crackers, sugar, and butter will not only enhance the overall taste but will also evoke the classic s’mores experience with every bite.
Creating the Creamy Cheesecake Filling
With the crust firmly in place, it’s time to turn our attention to the star of the show: the creamy cheesecake filling. This layer brings richness and depth to the jars, making each spoonful a luxurious experience.
The Role of Cream Cheese
At the heart of the cheesecake filling is cream cheese, which provides a smooth and creamy texture. The use of full-fat cream cheese is essential, as it ensures a rich flavor and prevents the filling from becoming too watery. For optimal results, allow the cream cheese to come to room temperature before mixing, as this will make it easier to incorporate and create a lump-free filling.
Step-by-Step Instructions for Mixing the Filling
1. Beat the Cream Cheese: In a large mixing bowl, beat the softened cream cheese with an electric mixer on medium speed until it is smooth and creamy. This should take about 2-3 minutes.
2. Add Sugar and Vanilla: Gradually add granulated sugar and vanilla extract to the cream cheese. Continue to mix until the sugar is fully incorporated and the mixture is smooth.
3. Incorporate the Heavy Whipping Cream: In a separate bowl, whip the heavy whipping cream until stiff peaks form. This step is crucial for achieving that light and airy cheesecake texture.
4. Fold the Whipped Cream: Gently fold the whipped cream into the cream cheese mixture. Use a spatula and a folding technique to maintain the volume and lightness of the whipped cream. Be careful not to overmix, as this can deflate the mixture.
5. Chill the Filling: Once the cheesecake filling is fully mixed, you can either use it immediately or chill it in the refrigerator for a short time to help it firm up slightly before assembling the jars.
The combination of cream cheese and heavy whipping cream creates a heavenly filling that is not only creamy but also incredibly flavorful. With the addition of vanilla extract, this layer is a delightful contrast to the crunchy crust, making every bite a perfect harmony of textures.
As we prepare to assemble the S’mores Cheesecake Jars, the anticipation builds. The combination of the graham cracker crust, the decadent cheesecake filling, and the indulgent toppings is bound to create a dessert that will leave everyone wanting more. Stay tuned for the next section, where we will dive into the final steps of assembling these delightful jars and adding the finishing touches that make S’mores Cheesecake Jars truly unforgettable.
{{image_2}}
Creating the perfect S’mores Cheesecake Jars is not just about the ingredients; it’s about the assembly, the presentation, and the delightful flavors that come together to create an unforgettable dessert. In this section, we will guide you through the steps of layering the cheesecake filling, elevating the flavor with toppings, chilling the jars for the best texture, and serving suggestions to make your dessert stand out.
Layering the Cheesecake Filling
Step-by-Step Instructions
1. Prepare Your Jars: Start with clean, dry jars. For individual servings, small mason jars or dessert cups work wonderfully. The size of your jars will determine how many layers you can create.
2. Layering the Cheesecake Filling: Using a piping bag or a spoon, carefully layer the cheesecake filling over the graham cracker crust. Aim for about 1/2 inch of filling for each layer.
– Tip for Even Layers: To achieve a smooth and even layer, gently tap the jars on a flat surface after adding each layer. This will help settle the filling and eliminate any air bubbles, creating a more aesthetically pleasing finish.
3. Building Up Layers: Continue layering the filling until you reach the top of the jar, leaving some space for your toppings. You can alternate layers of cheesecake filling with additional crushed graham crackers for added texture.
4. Visual Appeal: After each layer, you can also add a sprinkle of crushed graham crackers or a few chocolate chips to make the layers visually appealing. This way, when you look at your jars, you’ll see delicious layers that invite you to dig in.
Elevating the Flavor with Toppings
Topping Description
The finishing touches are what make these S’mores Cheesecake Jars truly special. Here’s what you’ll need:
– Mini Marshmallows: These add that classic s’mores flavor and a pop of sweetness.
– Milk Chocolate Chips: Rich and creamy, they melt beautifully when combined with the warmth of toasted marshmallows.
– Crushed Graham Crackers: These provide texture and reinforce the graham cracker crust flavor.
Alternative Toppings and Variations
Feel free to customize your jars based on personal preferences. Here are some ideas:
– Dark Chocolate Chips: For a richer chocolate experience.
– Nutella Drizzle: Adds an indulgent twist and pairs perfectly with the flavors.
– Peanut Butter: Layer some peanut butter between the cheesecake layers for a nutty flavor.
Techniques for Toasting Marshmallows
To achieve that coveted toasted marshmallow flavor, you can use a few different techniques:
1. Kitchen Torch: This is the most effective method. Hold the torch a few inches away from the marshmallows and move it around to ensure even toasting.
– Safety Tip: Always use the torch in a well-ventilated area and keep a safe distance from the flames.
2. Broiler: Place the jars under the broiler for a few minutes, keeping a close eye to prevent burning.
– Safety Tip: Use oven mitts when handling the hot jars, and do not leave them unattended while under the broiler.
Chilling and Setting the Cheesecakes
Importance of Chilling
Chilling is a crucial step in crafting the perfect S’mores Cheesecake Jars. This process allows the flavors to meld beautifully and helps the cheesecake filling set to the right consistency.
Recommended Chilling Times
For best results, chill the jars in the refrigerator for at least 4 hours, although overnight is ideal. This longer chilling time enhances the flavors and ensures a creamy texture that is easy to spoon from the jars.
Presentation Ideas Before Serving
Before serving, consider garnishing your S’mores Cheesecake Jars with extra toppings. A drizzle of chocolate sauce, a sprinkle of crushed graham crackers, or even a few whole mini marshmallows can elevate the presentation.
– Extra Touch: Tie a ribbon around the jars or place them on a decorative platter for a special touch, especially if you’re serving them at a gathering.
Serving Suggestions and Pairings
Serving Ideas
S’mores Cheesecake Jars are perfect for various occasions, from casual gatherings to festive celebrations. Here are some serving suggestions:
– Portion Sizes: Each jar typically serves one, making them ideal for individual servings. You can also prepare larger jars for sharing.
– Occasions: These jars are perfect for summer barbecues, picnics, birthday parties, or even as a fun dessert for movie nights at home.
Beverage Pairings
Consider serving your S’mores Cheesecake Jars with beverages that enhance the dessert experience:
– Coffee or Espresso: The rich flavors of coffee complement the sweetness of the cheesecake and chocolate.
– Milk or Hot Chocolate: For a classic pairing that evokes childhood memories of s’mores by the campfire.
– Sweet Dessert Wines: Such as a late-harvest Riesling or Moscato, which contrast beautifully with the rich cheesecake.
Elegant Presentation Tips
To impress your guests, focus on how you present the jars:
– Layered Presentation: Arrange the jars in a visually appealing manner on a large serving tray.
– Decorative Accents: Use fresh mint leaves or edible flowers as garnishes to add color and freshness.
Conclusion
S’mores Cheesecake Jars are an ideal dessert choice that combines the nostalgic flavors of campfire s’mores with the creamy delight of cheesecake. They are not only incredibly delicious but also fun and easy to make, making them perfect for both casual and special occasions.
The process of assembling these jars allows for creativity and personalization, letting you enjoy the experience of cooking while creating a delightful treat. We encourage you to try this recipe and share it with loved ones, evoking memories of summer nights spent around the fire. Reimagining s’mores in this elegant cheesecake format captures the essence of comfort food while presenting it in a modern, stylish way.
Enjoy every layer, every bite, and the joy of sharing this delightful dessert with friends and family!