
Decadent Molten Lava Chocolate Mug Cakes: The Ultimate Indulgence
When it comes to desserts, few things can rival the allure of chocolate. The rich, velvety texture combined with its deep, satisfying flavor has made chocolate a beloved ingredient across cultures and generations. Among the vast array of chocolate desserts, molten lava cakes hold a special place. Their warm, gooey center and decadent exterior create an extraordinary dessert experience that feels indulgent yet attainable. But what if you could enjoy this gourmet treat in just a few minutes, without the need for elaborate baking setups? Enter the decadent molten lava chocolate mug cake—a quick and easy solution that promises to satisfy your chocolate cravings in no time.
Mug cakes have surged in popularity over the past decade, celebrated for their convenience and simplicity. They transform the traditional cake-making process into an effortless experience, allowing anyone to whip up a delicious dessert in under five minutes. With just a few basic ingredients and a microwave, you can create a dessert that rivals those found in the finest restaurants. The molten lava chocolate mug cake elevates this concept by combining the beloved characteristics of molten chocolate cakes with the ease of preparation that mug cakes offer.
The Allure of Molten Lava Cakes
The history of molten lava cakes can be traced back to the 1980s, attributed to French pastry chef Jacques Torres, who is often credited with popularizing this delightful dessert. The initial concept revolves around a cake that is baked just enough to achieve a delicate outer shell while keeping the inner layer molten and gooey. This perfectly balanced texture creates an unforgettable experience with each bite, making it a favorite among chocolate lovers around the globe.
The unique appeal of molten lava cakes lies not only in their impressive presentation but also in their flavor profile. The combination of rich chocolate, a hint of sweetness, and the warmth of the molten center creates a symphony of taste and texture that is hard to resist. Served warm, often with a scoop of vanilla ice cream or a dollop of whipped cream, these cakes offer a luxurious indulgence that feels like a special occasion.
Understanding the Ingredients
Creating the perfect decadent molten lava chocolate mug cake starts with understanding the essential ingredients that contribute to its rich flavor and gooey texture. Each component plays a crucial role in ensuring that your mug cake is not only delicious but also achieves that desired molten center.
– All-Purpose Flour: This pantry staple forms the foundation of your mug cake, providing structure and stability. While it is the primary ingredient that gives the cake its body, the amount used is carefully measured to ensure the cake remains soft and tender.
– Granulated Sugar: Sugar is not just a sweetener; it plays a vital role in moisture retention, contributing to the cake’s overall texture. It helps create a tender crumb and balances the richness of the chocolate.
– Unsweetened Cocoa Powder: The heart of this recipe, cocoa powder intensifies the chocolate flavor. It adds depth and richness to the cake, making every bite a chocolate lover’s dream.
– Baking Powder: A leavening agent, baking powder is essential for providing lift. It helps the cake rise and achieve that light, fluffy texture, ensuring that even with a molten center, the cake maintains its shape.
– Salt: Often overlooked, salt is a crucial ingredient that enhances the overall flavor of the cake. A pinch of salt brings out the sweetness and balances the richness of the chocolate, making every bite more flavorful.
– Milk and Vegetable Oil: These ingredients contribute to the moistness of the cake. Milk adds creaminess, while vegetable oil ensures the cake remains tender and prevents it from becoming dry.
– Vanilla Extract: A splash of vanilla extract elevates the flavor profile, adding a subtle warmth that complements the chocolate. It rounds out the taste and makes the cake even more aromatic.
– Chocolate Chips: These little morsels are what make the molten lava cake truly special. When added to the batter, they melt beautifully, creating that iconic gooey center that oozes with chocolate goodness.
Step-by-Step Preparation
Creating your decadent molten lava chocolate mug cake is a straightforward process that requires just a few minutes and minimal effort. Here’s a brief overview of the step-by-step preparation:
1. Gather Your Ingredients: Start by measuring out all the ingredients you will need. Having everything prepped and ready to go will streamline the process.
2. Mix Dry Ingredients: In a microwave-safe mug, combine the all-purpose flour, granulated sugar, unsweetened cocoa powder, baking powder, and salt. Use a fork or small whisk to mix these dry ingredients thoroughly, ensuring there are no lumps.
3. Add Wet Ingredients: Create a well in the center of the dry mixture and add the milk, vegetable oil, and vanilla extract. Stir until all the ingredients are well combined and you have a smooth batter.
4. Incorporate Chocolate Chips: Gently fold in the chocolate chips, ensuring they are evenly distributed throughout the batter. This step is crucial for achieving that delightful molten center.
5. Microwave: Place the mug in the microwave and cook on high for about 30 to 40 seconds. Keep a close eye on the cake as microwaves can vary in power. The goal is to cook the cake just enough so that the edges are set but the center remains soft and gooey.
6. Cool Slightly and Serve: Allow the mug cake to cool for a minute or two before indulging. This waiting period lets the molten center settle slightly, making it easier to dig into.
The allure of molten lava chocolate mug cakes is undeniable. With their rich history and mouthwatering flavor profile, these cakes are a testament to the joy of chocolate desserts. By understanding the key ingredients and following a straightforward preparation process, you can create a gourmet dessert experience in the comfort of your own kitchen.
{{image_2}}
Mixing Dry Ingredients
To begin the preparation of your Decadent Molten Lava Chocolate Mug Cake, start by gathering your dry ingredients: all-purpose flour, unsweetened cocoa powder, granulated sugar, baking powder, and a pinch of salt. It’s essential to mix these dry components thoroughly to ensure an even distribution of flavors and leavening agents. Clumps can form if the dry ingredients aren’t aerated and combined well, leading to uneven baking and texture in your final product.
Use a whisk or a fork to sift through the mixture. This not only helps break up any lumps but also introduces air into the flour, which is crucial for a light and fluffy cake. Take your time with this step, as a well-blended dry mixture sets the foundation for a successful mug cake.
Adding Wet Ingredients
Once your dry ingredients are perfectly mixed, it’s time to add the wet ingredients: milk, vegetable oil, and a splash of vanilla extract. The importance of achieving a smooth batter cannot be overstated; this is where the magic of your mug cake begins. Pour the wet ingredients into the bowl of dry ingredients and mix gently with a spatula or spoon.
Take care not to overmix, as this can lead to a dense cake. Instead, aim for a smooth consistency where no dry flour remains visible. The blending of wet and dry ingredients should be done just until combined; a few small lumps are perfectly acceptable and will dissolve during cooking. An even batter ensures that the molten center develops correctly, providing that signature lava effect.
Incorporating Chocolate Chips
Now comes the fun part: folding in the chocolate chips. This step adds delightful pockets of gooey chocolate throughout your mug cake. Use a gentle folding technique to incorporate the chocolate chips into the batter, ensuring you maintain the airiness of the mixture. Folding instead of stirring helps to keep the batter light and fluffy, which is essential for achieving the desired texture.
Choose high-quality chocolate chips for the best flavor; semi-sweet chocolate works wonderfully, but feel free to experiment with dark or milk chocolate. Once the chips are evenly distributed, your batter is ready for the microwave.
Microwaving the Mug Cake
Pour the batter into a microwave-safe mug, filling it about halfway to allow space for the cake to rise. Place the mug in the microwave and cook on high for approximately 30 to 40 seconds. Keep a close eye on the mug cake as it cooks; microwaves can vary in power, and you want to avoid overcooking.
The cake is done when the edges appear set, but the center remains slightly soft. Remember that the mug cake will continue to cook in the residual heat after you remove it from the microwave, so it’s crucial not to overdo it. If you’re unsure, it’s better to undercook slightly, as you can always return it to the microwave for a few more seconds.
Letting It Stand
After microwaving, let the mug cake stand for about 1 minute. This resting period is vital for achieving the perfect texture. During this time, the heat will continue to cook the cake gently, allowing the center to firm up just enough to hold the molten filling. This brief pause also allows the flavors to meld together, enhancing the overall taste of your dessert.
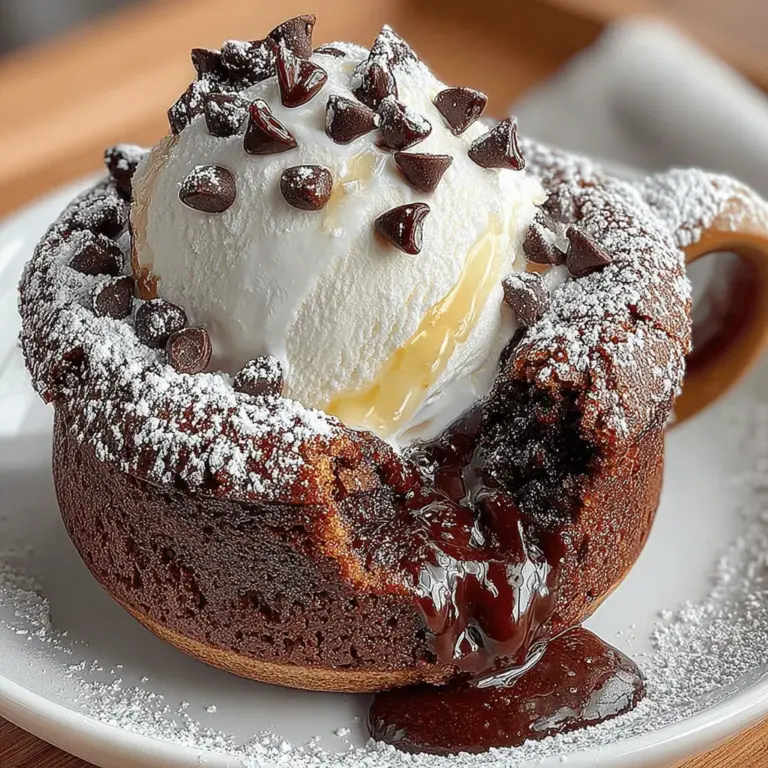
Serving Suggestions
Presentation is key when it comes to enjoying your mug cake. For an elegant touch, dust the top with powdered sugar using a fine sieve. This simple garnish adds a professional flair and a touch of sweetness. To elevate your dessert further, consider serving it with a scoop of vanilla ice cream or a dollop of freshly whipped cream. The cold creaminess perfectly contrasts the warm, gooey center, creating a delightful balance of temperatures and textures.
You can also add fresh berries or a drizzle of chocolate sauce for added flavor and visual appeal. The versatility in presentation makes this mug cake a fantastic option for both casual snacking and special occasions.
Why This Recipe Works
The beauty of the Decadent Molten Lava Chocolate Mug Cake lies in its balance of ingredients and the microwave cooking method. The combination of flour, sugar, cocoa powder, and leavening agents creates a rich, chocolatey base that is both satisfying and indulgent. The quick cooking time in the microwave retains moisture, ensuring that the center remains gooey and molten, which is essential for that coveted lava effect.
The ease of preparation and the speed at which this recipe comes together make it an ideal choice for satisfying chocolate cravings at a moment’s notice. Plus, the single-serving size means you can enjoy a decadent dessert without the commitment of a full cake.
Variations and Customizations
Flavor Variations
While the classic molten lava chocolate mug cake is undeniably delicious, there are numerous ways to customize this recipe to suit your taste preferences. For a nutty twist, consider adding a tablespoon of peanut butter or almond butter to the wet ingredients before mixing. This not only adds flavor but also creates a delightful marbled effect in your cake.
If you’re looking for a different type of chocolate experience, try using white chocolate chips or even caramel bits for a unique flavor profile. You can also add a teaspoon of instant coffee granules to enhance the chocolate flavor, making it richer and more complex.
Dietary Modifications
For those with dietary restrictions, this recipe can be easily adapted to accommodate gluten-free or vegan diets. To make a gluten-free version, simply substitute the all-purpose flour with a gluten-free flour blend. Ensure that your chocolate chips are also gluten-free.
To create a vegan mug cake, replace the milk with a plant-based alternative, such as almond milk or coconut milk, and use a vegan egg substitute like flaxseed meal or applesauce. Additionally, choose dairy-free chocolate chips to keep the dessert entirely vegan-friendly. These modifications allow everyone to enjoy the molten lava experience without compromising on taste.
The Perfect Pairing
To complement the richness of your molten lava cake, consider pairing it with a variety of beverages. A robust cup of coffee, such as an espresso or a dark roast, enhances the chocolate flavor while providing a nice contrast to the sweetness of the dessert. If you prefer something sweeter, a dessert wine like port or a rich red wine can elevate the indulgence.
For a non-alcoholic option, a glass of cold milk or a creamy vanilla bean latte can be a delightful accompaniment. These pairings enhance the overall experience, making your chocolate mug cake even more enjoyable.
Conclusion
The Decadent Molten Lava Chocolate Mug Cake is an irresistible treat that delivers on both flavor and convenience. This quick and comforting dessert is an easy way to satisfy your chocolate cravings, whether for a weeknight indulgence or a special occasion. With its rich, gooey center and simple preparation, this recipe proves that you can create gourmet experiences in mere minutes.
Embrace the joy of making homemade desserts that not only satisfy your sweet tooth but also bring a smile to your face. With endless variations and customization options, this mug cake is sure to become a go-to recipe for chocolate lovers everywhere. So grab your mug, whip up this delightful cake, and enjoy the warm, molten goodness that awaits you.
