Zesty Zaatar Mini Pita Pizzas: A Flavorful Snack for Every Occasion
Mini pita pizzas are a delightful culinary creation that combines the convenience of pita bread with the endless possibilities of pizza toppings. These bite-sized treats are not only quick to prepare but also incredibly versatile, making them an ideal option for busy weeknight dinners or as a fun, interactive dish for gatherings with family and friends. Imagine a warm, fluffy pita base topped with a medley of fresh ingredients, all brought together by a unique and aromatic spice blend—this is where the magic of zaatar comes into play.
Zaatar, a traditional Middle Eastern spice blend, elevates these mini pizzas to a new level of flavor. Characterized by its earthy notes and a hint of tanginess, zaatar is typically made from a mix of dried herbs, sesame seeds, and tangy sumac. This blend not only adds complexity to the dish but also offers a taste of the Middle Eastern culinary heritage. The combination of zaatar and the classic pizza format transforms these mini pita pizzas into a gourmet experience that is both satisfying and accessible.
Whether you’re looking for a quick dinner solution or a crowd-pleasing appetizer, Zesty Zaatar Mini Pita Pizzas are a perfect choice. They can be customized to suit various tastes, allowing everyone to enjoy a personalized culinary experience. Plus, their bite-sized nature makes them easy to serve and share, making them a hit at any casual gathering or party.
Understanding Zaatar: A Flavorful Spice Blend
To truly appreciate the magic of Zesty Zaatar Mini Pita Pizzas, it’s essential to understand the zaatar spice blend itself. Originating from the Middle East, zaatar is not just a singular spice but rather a harmonious blend of several aromatic ingredients. The most common components include dried thyme, oregano, marjoram, sesame seeds, and sumac, which gives the blend its distinctive tart flavor. Each ingredient contributes its unique profile, creating a complex taste that enhances various dishes, from meats to vegetables and, of course, pita pizzas.
The versatility of zaatar extends beyond its flavor; it is also celebrated for its numerous health benefits. Many of its ingredients are rich in antioxidants, which help combat oxidative stress in the body. Additionally, zaatar is believed to aid digestion and improve cognitive function, making it not only a delicious addition to your meals but also a healthful one. Incorporating zaatar into your cooking can introduce not just flavor but also a host of nutritional advantages, making it a wise choice for those looking to enhance their diet.
Ingredients Breakdown
Creating Zesty Zaatar Mini Pita Pizzas requires a few key ingredients that come together to create a vibrant and flavorful dish. Here’s a closer look at what you’ll need:
1. Mini Pita Bread: The foundation of your pizza, mini pitas are perfect for individual servings. Their soft texture allows them to hold up under toppings without becoming soggy.
2. Zaatar Spice Blend: You can purchase pre-made zaatar, but for the freshest taste, consider making your own by combining dried herbs, sesame seeds, and sumac.
3. Olive Oil: A drizzle of high-quality olive oil enhances the flavors and helps in cooking.
4. Fresh Vegetables: Tomatoes, bell peppers, and red onions provide a colorful and nutritious topping. Fresh herbs like parsley or mint can also add brightness.
5. Cheese: Feta or mozzarella cheese works beautifully, melting into a creamy layer that contrasts with the crispy pita base.
6. Protein (optional): For those looking to add a heartier element, grilled chicken marinated in zaatar can take these mini pizzas to the next level.
Using fresh ingredients is crucial for optimal flavor and texture. When selecting produce, look for vibrant, firm vegetables that will hold their shape during cooking. If you opt to include chicken, choose high-quality, organic poultry for the best taste and nutritional value.
Marinating the Chicken
If you decide to include chicken in your Zesty Zaatar Mini Pita Pizzas, marinating is an essential step that will significantly enhance the flavor and tenderness of the meat. Marinating chicken with zaatar is simple yet transformative. Here’s a step-by-step guide to help you through the process:
1. Prepare the Marinade: In a mixing bowl, combine a few tablespoons of olive oil with a generous amount of zaatar. You can also add minced garlic, salt, and pepper for added flavor.
2. Cut the Chicken: Use boneless, skinless chicken breasts or thighs for this recipe. Cut them into bite-sized pieces for even cooking and easy assembly on the mini pizzas.
3. Combine: Add the chicken pieces to the marinade, ensuring they are well coated. The olive oil helps the spices adhere to the chicken while also keeping it moist during cooking.
4. Marinate: Cover the bowl with plastic wrap or transfer the contents to a resealable bag. For optimal results, let the chicken marinate in the refrigerator for at least 30 minutes. If you have more time, marinating for several hours or overnight will deepen the flavors significantly.
Marinating not only infuses the chicken with the aromatic flavors of zaatar but also helps break down the protein, leading to a more tender texture. The acidity from the olive oil and the spices works together to create a deliciously seasoned piece of chicken that will complement the other components of your mini pizzas beautifully.
Cooking the Chicken Perfectly
Once your chicken has marinated, it’s time to cook it to perfection. There are a couple of methods you can choose from: grilling or pan-searing. Both techniques yield delicious results but require slightly different approaches.
Grilling: If you have access to a grill, this method adds a wonderful smoky flavor to the chicken. Preheat your grill to medium-high heat and make sure to oil the grates to prevent sticking. Cook the marinated chicken pieces for about 6-8 minutes per side, or until they reach an internal temperature of 165°F. Use a meat thermometer to ensure accuracy and avoid overcooking.
Pan-Searing: If grilling isn’t an option, pan-searing is a great alternative. Heat a tablespoon of olive oil in a skillet over medium heat. Add the marinated chicken pieces in a single layer, making sure not to overcrowd the pan. Cook for about 5-7 minutes on each side, checking for doneness. Again, an internal temperature of 165°F is key for food safety.
Both cooking methods enhance the flavors of the zaatar and ensure that the chicken remains juicy and tender, setting the stage for your Zesty Zaatar Mini Pita Pizzas. As you prepare to assemble your pizzas, you’ll be delighted by the aromatic scent of the cooked chicken mingling with the fresh ingredients, promising a dish that is as pleasing to the senses as it is to the palate.
{{image_2}}
Zesty Zaatar Mini Pita Pizzas are a delightful twist on traditional pizza, combining the aromatic flavors of zaatar spice with the convenience of bite-sized pitas. This recipe is not only easy to prepare but also offers a unique taste profile that will tantalize your taste buds. In the following sections, we will guide you through the steps to create these delicious mini pizzas, from preparing the pita bases to serving suggestions that will impress your guests. Let’s dive into the details!
Resting the Chicken Before Slicing: Why It Matters
Before we jump into creating the mini pita bases, it’s essential to understand the importance of allowing cooked chicken to rest. Resting your chicken for about 5-10 minutes after cooking helps retain its juices, resulting in more tender and flavorful slices. If you slice the chicken too soon, the juices will run out, leading to dry meat. This step is crucial, especially if you’re using grilled or baked chicken as a topping for your mini pita pizzas.
Creating the Mini Pita Bases
Instructions for Preparing the Pita Bases for Baking
To begin, preheat your oven to 400°F (200°C). While the oven is heating, take your whole wheat pitas and prepare them for baking. Whole wheat pitas not only add a nutty flavor but also enhance the nutritional value of your mini pizzas by providing more fiber and essential nutrients compared to white pitas.
1. Lining the Baking Sheet: Line a baking sheet with parchment paper. This step is essential as it prevents the pita from sticking to the surface, allowing for easy removal after baking. Additionally, parchment paper ensures even cooking and cleanup is a breeze.
2. Arranging the Pitas: Place the whole wheat pitas on the lined baking sheet. Ensure they are spaced out evenly to allow for proper heat circulation.
Importance of Lining the Baking Sheet
Using parchment paper not only prevents sticking but also helps in achieving a crispy bottom on the pitas as they bake. It’s a straightforward step that enhances the overall cooking experience and ensures your mini pizzas come out perfectly every time.
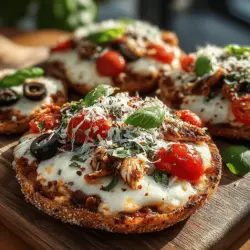
Assembling the Mini Pita Pizzas
Detailed Description of the Assembly Process
Now that your pita bases are ready, it’s time to assemble the mini pita pizzas. This is where the fun begins!
1. Spread the Base: Start by spreading a thin layer of your favorite tomato sauce or hummus over each pita. A thin layer is key, as it allows the other flavors to shine without overwhelming the base.
2. Add Zaatar: Sprinkle a generous amount of zaatar spice blend over the sauce. This Middle Eastern spice mix is a combination of thyme, oregano, marjoram, sesame seeds, and sumac, which adds a zesty flavor that elevates your mini pizzas.
3. Layer the Toppings: Next, add your toppings. You can use shredded mozzarella cheese for a classic taste or experiment with other cheeses like feta or goat cheese for a tangy twist. Follow the cheese with sliced grilled chicken, bell peppers, olives, and any other ingredients of your choice.
Suggestions for Ingredient Variations
One of the best aspects of mini pita pizzas is their versatility. Here are some creative variations to consider:
– Vegetarian Options: For a vegetarian version, skip the chicken and load your mini pizzas with colorful vegetables like spinach, artichokes, or zucchini.
– Different Cheeses: Experiment with different types of cheese such as provolone, gouda, or a vegan cheese alternative to cater to various dietary preferences.
– Additional Flavorings: Consider adding ingredients like roasted garlic, sun-dried tomatoes, or a drizzle of balsamic glaze for added depth and flavor.
Baking for the Perfect Finish
Recommended Oven Temperature and Baking Time
Once your mini pita pizzas are assembled, it’s time to bake them. Place the baking sheet in your preheated oven and bake for about 10-12 minutes, or until the cheese is melted and bubbly, and the edges of the pitas are golden brown.
Signs to Look for to Know When the Mini Pita Pizzas Are Done
Keep an eye on your mini pizzas as they bake. You’ll know they’re done when the cheese is bubbling and slightly browned, and the pitas look crisp. If you prefer a more toasted finish, you can broil them for an additional minute or two, but be sure to watch closely to avoid burning.
Importance of Letting Them Cool Slightly Before Serving
After removing the mini pizzas from the oven, allow them to cool for a couple of minutes on the baking sheet. This resting period helps the cheese set slightly, making it easier to slice and serve without the toppings sliding off.
Serving Suggestions and Pairings
Ideas for Garnishing the Mini Pita Pizzas
Garnishing your mini pita pizzas adds an extra touch of flavor and visual appeal. Consider adding:
– Fresh Herbs: Sprinkle chopped parsley, cilantro, or mint on top for a refreshing pop of flavor.
– Extra Toppings: Add a few slices of fresh tomatoes, pickled onions, or a dollop of tzatziki sauce for an added layer of taste.
Recommended Side Dishes or Dips
To complement your mini pita pizzas, serve them with side dishes or dips that accentuate their flavors:
– Hummus: A classic Middle Eastern dip made from chickpeas, tahini, and lemon juice pairs perfectly with pita bread.
– Salad: A simple Mediterranean salad with cucumbers, tomatoes, olives, and feta drizzled with olive oil and lemon juice makes a refreshing side.
– Tzatziki: This yogurt-based dip with cucumber and garlic provides a cool balance to the zesty flavors of the pizzas.
Presentation Tips for Serving at Parties or Family Meals
When serving your mini pita pizzas, presentation matters. Arrange them on a large platter with a colorful assortment of garnishes and dips. Consider using small toothpicks to hold the pizzas together for easy serving at parties. This not only makes it easier for guests to grab a slice but also adds a fun touch to your presentation.
Conclusion
In summary, Zesty Zaatar Mini Pita Pizzas are a delightful and versatile dish that can be enjoyed for various occasions, from casual family dinners to festive gatherings. With their unique flavors and easy preparation, these mini pizzas are sure to please everyone at the table. By combining wholesome ingredients like whole wheat pitas, flavorful zaatar, and your choice of toppings, you can create a dish that is not only delicious but also nutritious.
We encourage you to try making these mini pita pizzas and explore the endless possibilities of toppings and flavors. Embrace the unique taste of zaatar and enjoy the satisfaction of creating a dish that is both fun to make and delightful to eat. Happy cooking!